Log in
Community Day 2026: Save the date!
You’ve been asking all year, and the wait is over… Mark your calendars, because Community Day 2026 will be held on Saturday, November 7! 🎉

You’ve been asking all year, and the wait is over… Mark your calendars, because Community Day 2026 will be held on Saturday, November 7! 🎉
Back in April during State of the Open Home 2026, we gave you a sneak peek of ESPHome’s very first official product… And after months of hard work alongside the community, the ESPHome Starter Kit is here! 🎉
Tip
Don’t forget to join our release party live stream on YouTube on August 5, 2026, at 20:00 GMT / 12:00 PT / 21:00 CET!
Tip
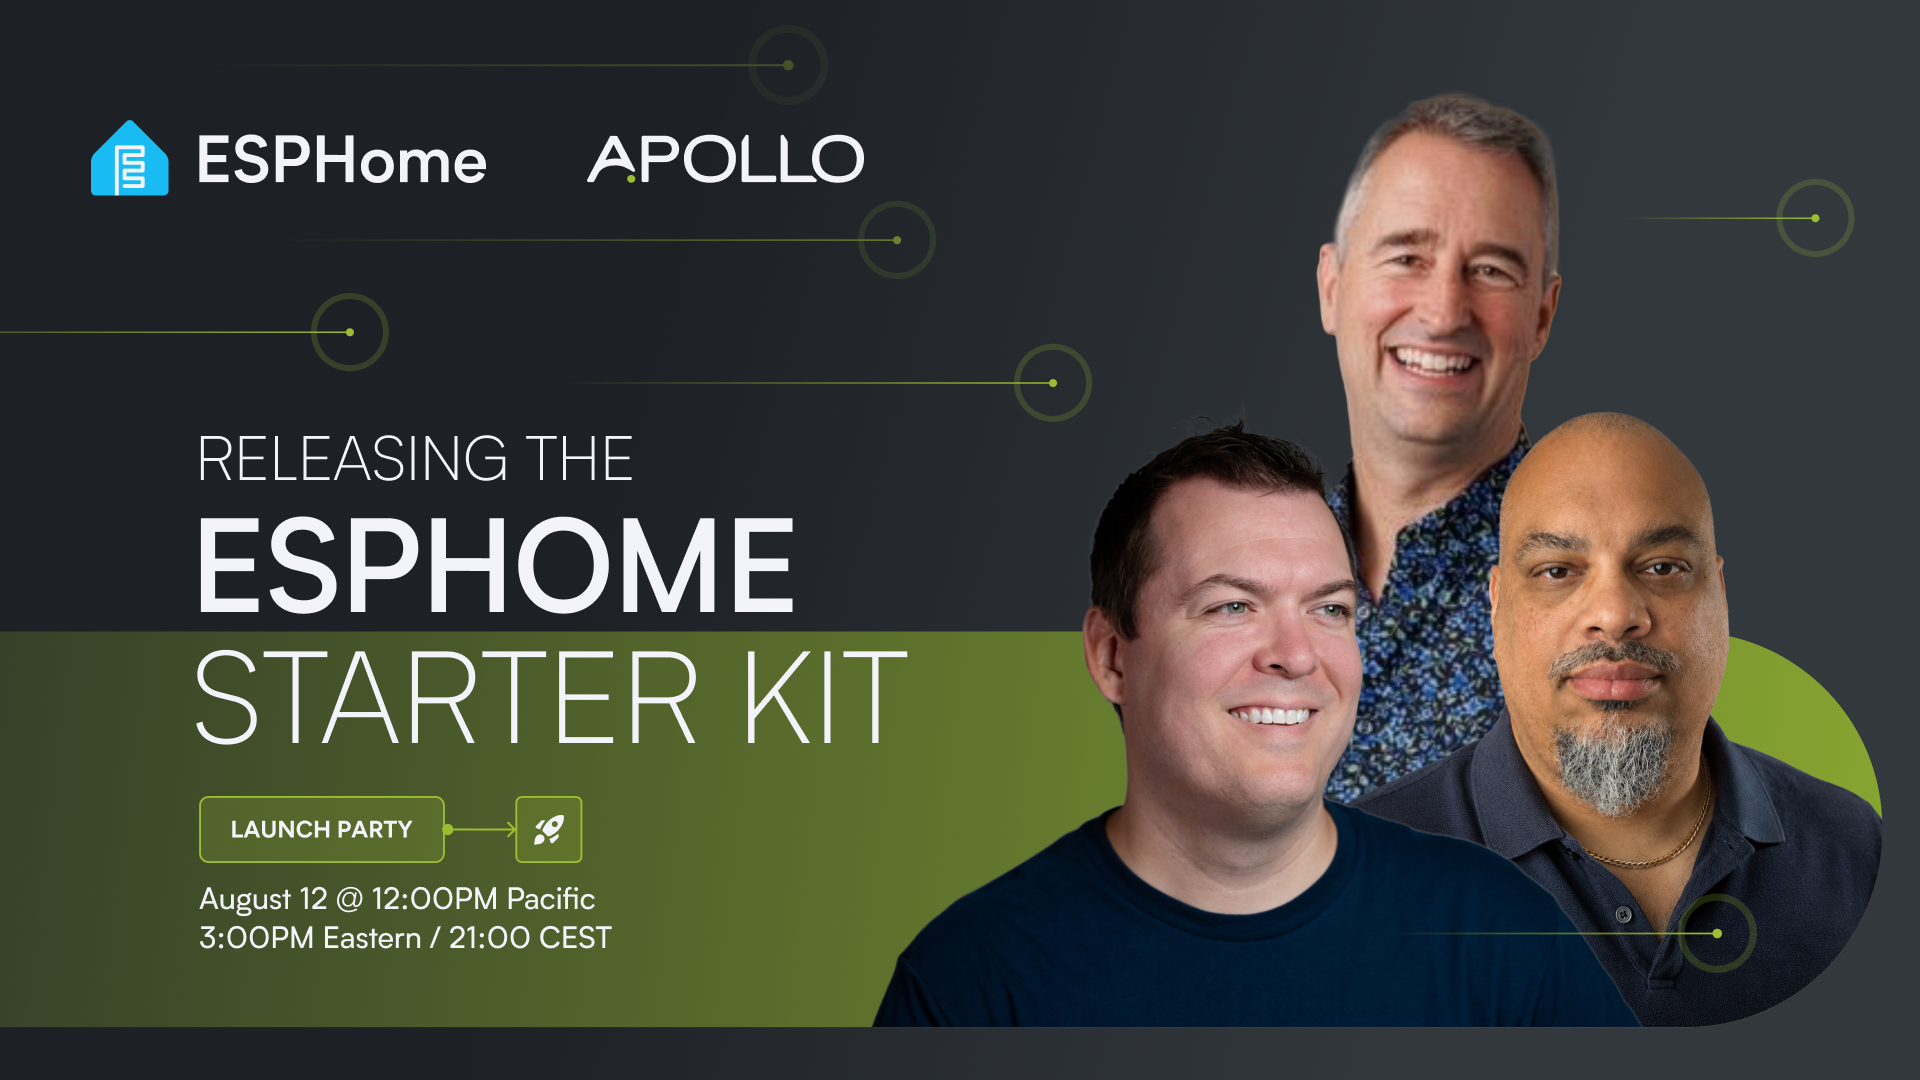 There’s more to look forward to next week: the ESPHome Starter Kit is launching, and you’re invited to the official launch party! 🚀 Join the ESPHome team and their partners at Apollo Automation on the ESPHome YouTube channel on August 12 at 21:00 CEST. Familiar faces are dropping by to celebrate lift-off, too: Reed from Smart Home Solver, Simon from Simon Says Home Assistant, and Gavin from HomeTech.fm.
Home Assistant 2026.8! 🎉
Hi, I’m Ashley, the Technical Program Manager at the Open Home Foundation. With Frenck taking a well-deserved break, Bram and I are teaming up to handle things this time around.
We have been working on a lot over the past few weeks, and I’m excited to share some of what we have done for this release!
If there’s one thread tying this release together, it’s a direction we care about: making Home Assistant something you don’t need to be technical to use. This release is another step along that path.
Enjoy the release!
- Ashley
A huge thank you to all the contributors who made this release possible! And a special shout-out to @frenck and @bramkragten who helped write the release notes this release. Also, @piitaya, @RaHehl, and @farmio for putting effort into tweaking its contents. Thanks to them, these release notes are in great shape. ❤️
One of the directions we care about most for Home Assistant is making it simpler to pick up and use, without compromising on capability. It’s something we have been working toward for a long time, and it runs through our roadmap and goals for this year. We cannot do it overnight though, so we keep listening to your feedback to make sure we are fixing the things that actually get in your way. If there is something you would like to see, we would love for you to weigh in. Every comment helps shape what comes next.
This release brings together some of that work. It may never be truly finished, and that is fine, but it is something we hold close: the more people who can use Home Assistant, whatever their technical ability, the better.
Ever wondered why the address for your own home has a random number stuck on the end? So did we. For years, reaching Home Assistant meant remembering to add :8123 to the address, a little piece of technical trivia that everyone simply had to learn. This release starts to put that right.
New installations of “Home Assistant OS”Home Assistant OS, the Home Assistant Operating System, is an embedded, minimalistic, operating system designed to run the Home Assistant ecosystem on single board computers (like the Raspberry Pi) or Virtual Machines. It includes Home Assistant Core, the Home Assistant Supervisor, and supports apps. Home Assistant Supervisor keeps it up to date, removing the need for you to manage an operating system. Home Assistant Operating System is the recommended installation type for most users. now use a normal web address by default, with no number to add on the end. You reach your home the same way you reach any website. Nothing extra to remember, nothing extra to type.
If you are already running Home Assistant, nothing changes and there is nothing you need to do. This only affects new installations of Home Assistant OS. Your existing installation is completely unchanged, keeps the exact port it has always used, and keeps working just as before. If everything works today, the simplest thing is to leave it exactly as it is.
You do not have to change anything, but if you would like the cleaner address, or need to change the port for another reason, you can now do it yourself from the interface. The same screen also holds a few more options, like choosing which network connection Home Assistant listens on and setting trusted proxies, for the setups that need them.
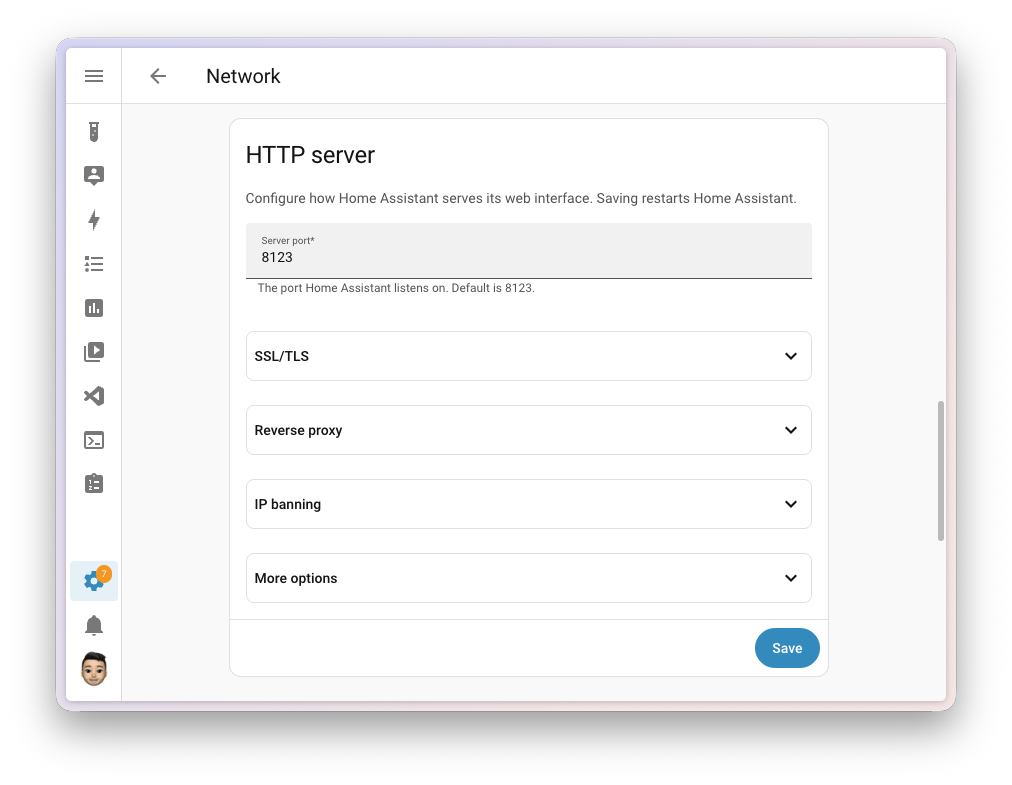
Changing something as fundamental as the port your home lives on can feel nerve-wracking, so we made it hard to get stuck. When you change the web server settings, Home Assistant applies the new configuration and then waits for you to confirm everything still works. If you do not confirm within five minutes, it assumes something went wrong, puts your previous settings back, and restarts. And if the new settings cannot be applied at all, it falls back right away. So if you ever lock yourself out with the wrong setting, you do not have to do anything: wait a few minutes, and Home Assistant returns you to where you were.
Note
One thing to keep in mind: anything that reaches Home Assistant using the old address may need updating to match the new port, such as your bookmarks or other services and tools you have connected, including the mobile app. If your setup works today, that is a good reason to leave it as it is.
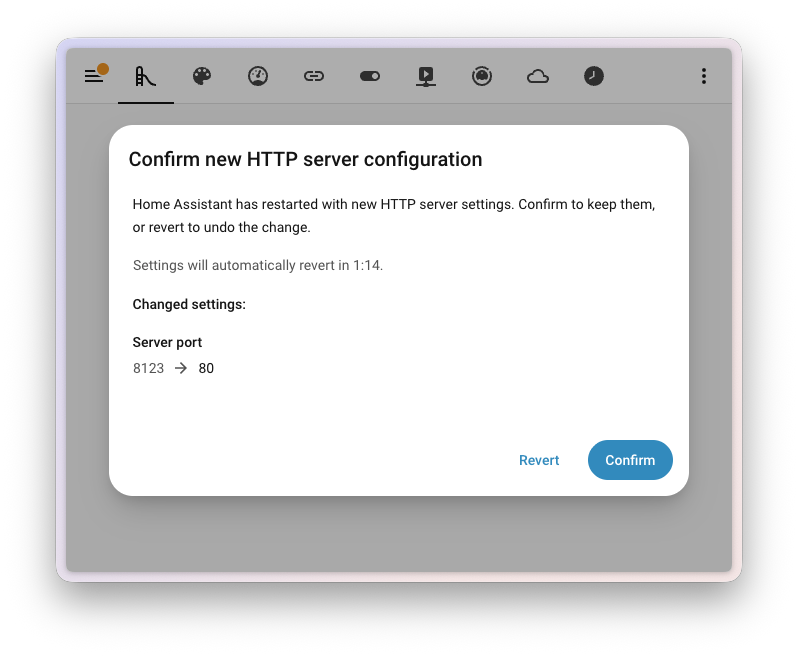
If you currently set up the web server in YAMLYAML is a human-readable data serialization language. It is used to store and transmit data in a structured format. In Home Assistant, YAML is used for configuration, for example in the configuration.yaml or automations.yaml files. [Learn more], you do not need to change anything. The first time you start Home Assistant after updating, your settings move into the interface for you, and you manage them there from then on. You might also see a repair appear, just to let you know your settings were imported; it can point you to tidying up the old YAML if you like, but nothing breaks either way.
A word comes up around Home Assistant a lot: advanced. But what does it actually mean, and who gets to decide what counts as advanced and what does not? Too often it is a label that quietly tells people a feature is not for them. We want Home Assistant to be approachable for everyone, so this release removes some of that language.
The clearest place to start is the words themselves. Labels like advanced and expert were dotted around Home Assistant. Words like these can be discouraging: they suggest a feature is not for you and steer you away from trying it, even when it is perfectly approachable. This release removes that wording in around 43 places, across the app, its documentation, and the companion apps. None of these features changed. Instead of rating your skill, the wording now simply describes what each one does.
A big thank you to everyone who helped comb through and clean this up! 👏
In the same spirit, Developer Tools is now simply Tools. It has always been a useful spot for everyone, whether you are checking the stateThe state holds the information of interest of an entity, for example, if a light is on or off. Each entity has exactly one state and the state only holds one value at a time. However, entities can store attributes related to that state such as brightness, color, or a unit of measurement. [Learn more] of your “devices”A device is a model representing a physical or logical unit that contains entities., testing a templateA template is an automation definition that can include variables for the action or data from the trigger values. This allows automations to generate dynamic actions. [Learn more], or reloading part of your setup, and you never needed to be a developer to use it. The shorter name matches how people actually use it, and feels a little friendlier to open.
Home Assistant Cloud by Nabu Casa is how many people add remote access, fast and private voice, encrypted backupsHome Assistant has built-in functionality to create files containing a copy of your configuration. This can be used to restore your Home Assistant as well as migrate to a new system. The backup feature is available for all installation types. [Learn more], and more to their home, all while supporting the project at the same time. Until now, everything it offers lived on a single long page of switches and settings. This release gives that page a proper redesign.
The main page is now a clean overview. Each feature (remote access, backups, voice assistants, the companion app, and more) has its own space, so you can see what you have turned on at a glance. The settings for each one move onto their own page, which keeps the overview tidy and makes every feature easier to understand on its own.
The bigger change is for anyone just getting started. There is now a guided setup that walks you through Home Assistant Cloud step by step, instead of leaving you to find your way around a wall of options. If it is not a good moment, you can put it off and pick it up again later.
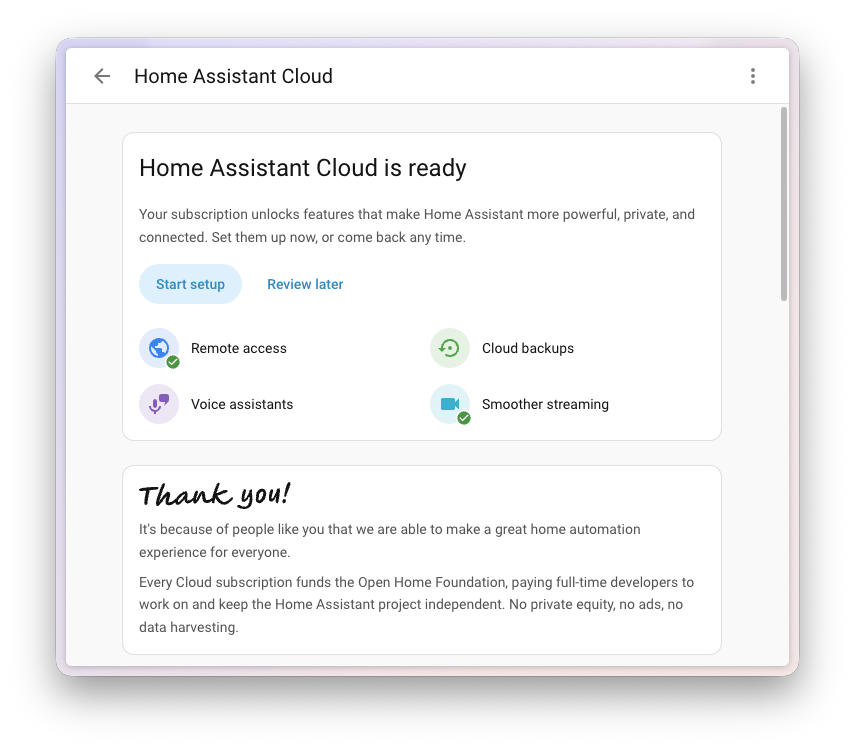
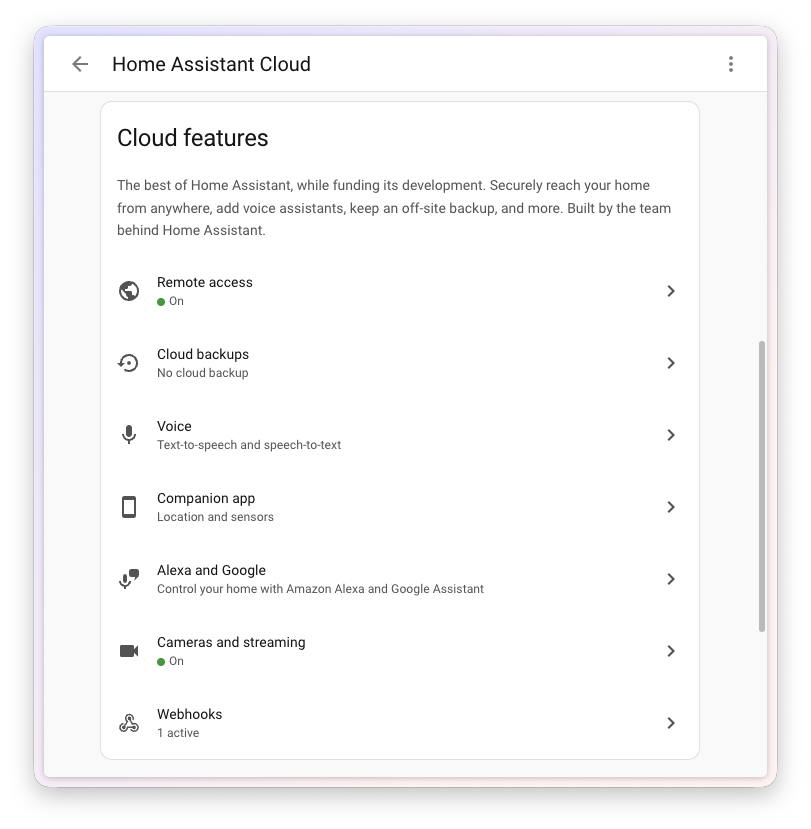
A big thank you to @klejejs for this redesign!
Behind every deviceA device is a model representing a physical or logical unit that contains entities. and sensorSensors return information about a thing, for instance the level of water in a tank. [Learn more] sits an entity ID, a short name such as light.kitchen_ceiling that your automationsAutomations in Home Assistant allow you to automatically respond to things that happen in and around your home. [Learn more], scriptsA script is a saved list of steps that runs when you start it, for example, from a dashboard, with Assist, or from an automation. Unlike an automation, a script has no triggers, so it doesn’t start by itself. [Learn more], and dashboards use to refer to it. Most of the time they look after themselves. But when you do want them neat and consistent, you should be the one deciding how they read.
Some earlier work looked at building entity IDs automatically from the areaAn area in Home Assistant is a logical grouping of devices and entities that represents a room or space in your home, such as the living room, kitchen, or garage. [Learn more] a device belongs to. Your feedback told us this suited some people but not everyone. So this release takes a more flexible route and puts you in charge: you can rename an entity ID yourself, and control how it is ordered, so your entitiesAn entity represents a sensor, actor, or function in Home Assistant. Entities are used to monitor physical properties or to control other entities. An entity is usually part of a device or a service. [Learn more] follow whatever naming pattern makes sense to you.
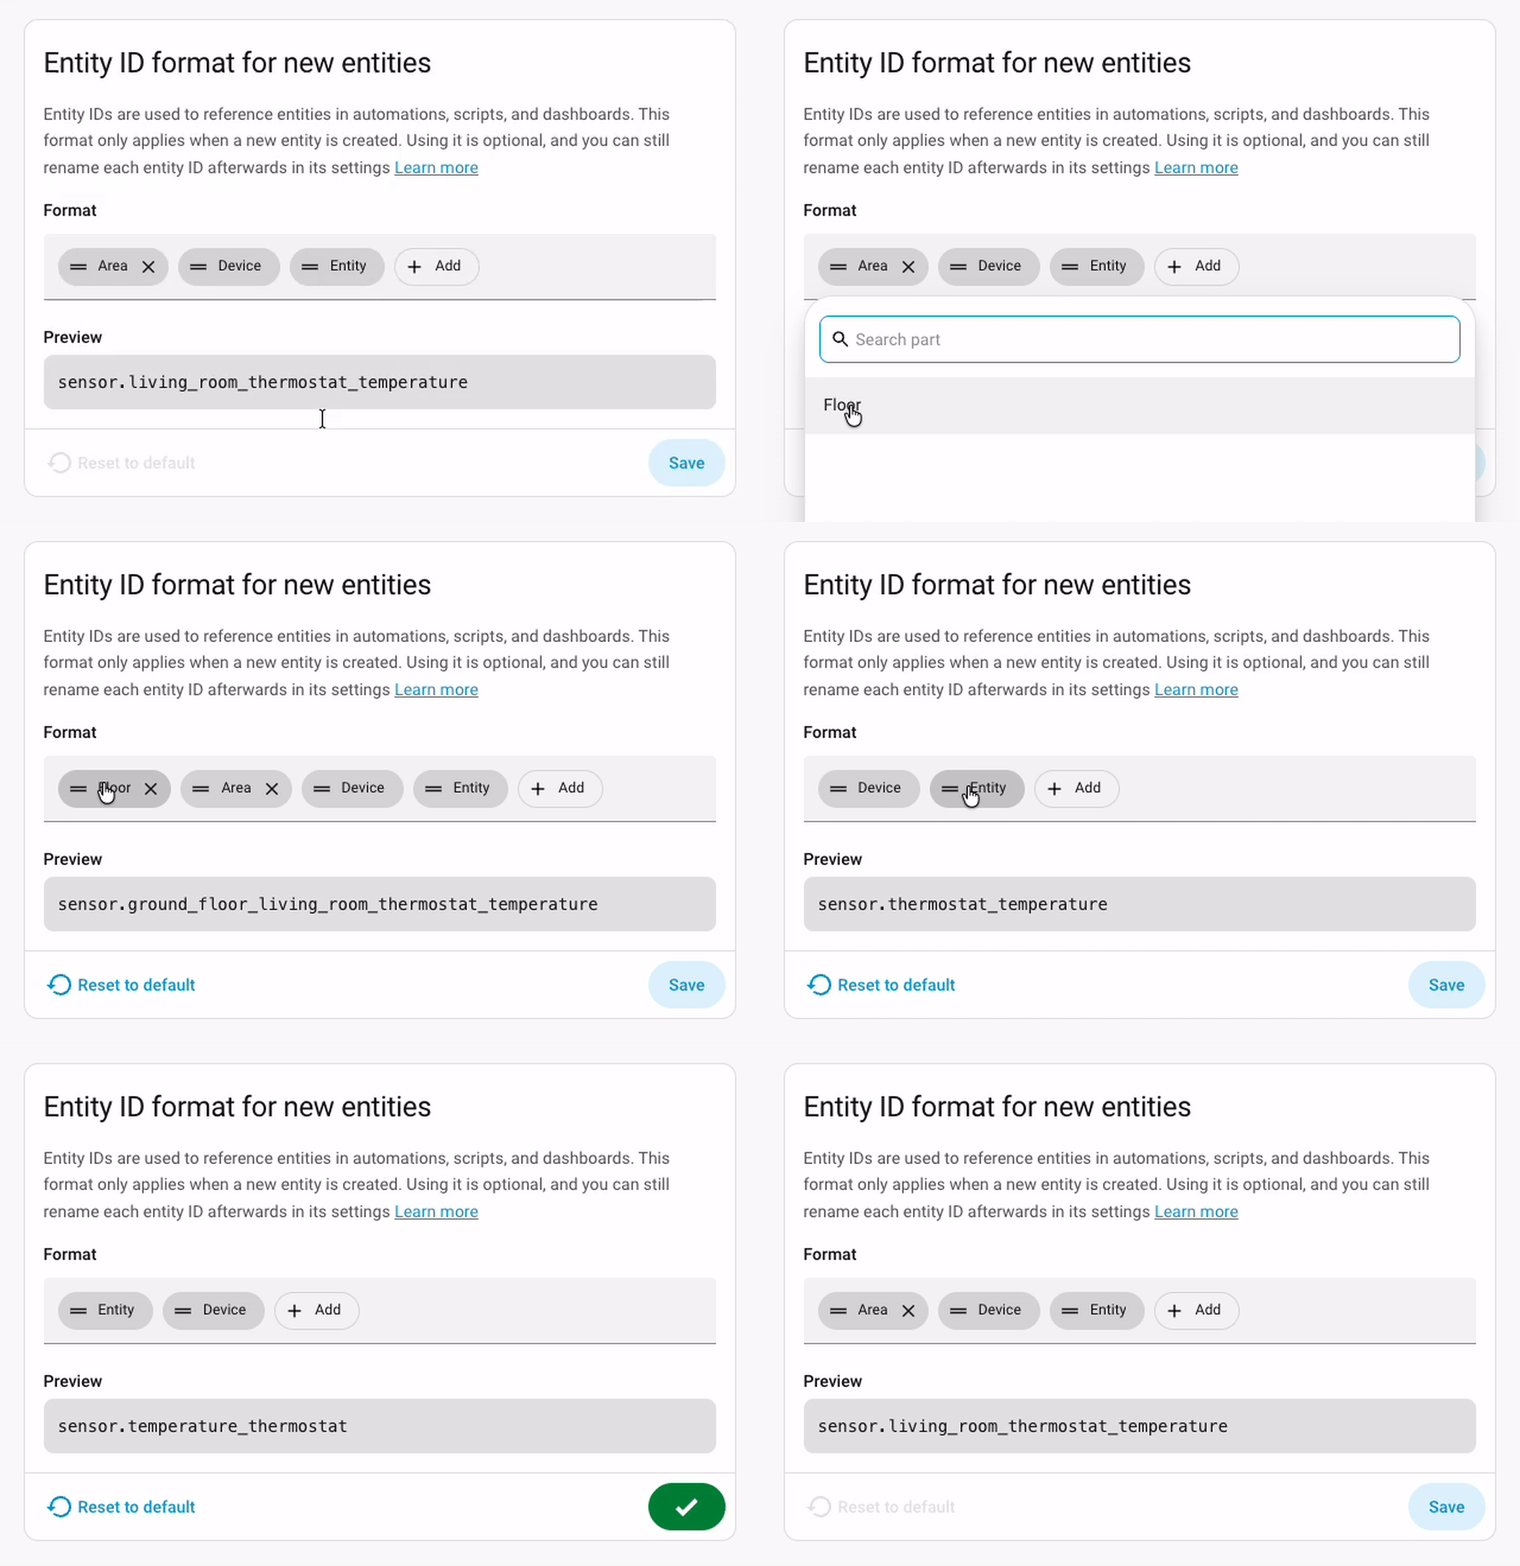
Thanks to @arturpragacz and @piitaya for this work.
Home Assistant is changing how it keeps track of your devices behind the scenes. Until now, if one physical deviceA device is a model representing a physical or logical unit that contains entities. was set up through two different integrationsIntegrations connect and integrate Home Assistant with your devices, services, and more. [Learn more], Home Assistant merged them into a single device. Details that can only hold one value, such as the model or serial number, could then clash. From this release, each integration keeps its own device entry, so nothing gets collapsed together.
When you update, any devices that were merged this way are separated automatically, and their entitiesAn entity represents a sensor, actor, or function in Home Assistant. Entities are used to monitor physical properties or to control other entities. An entity is usually part of a device or a service. [Learn more] move to the right device for you. Most people will not notice a thing. In the rarer cases where a device was set up through more than one integration, you might see it appear twice, once per integration, and Home Assistant may raise a repair to let you know.
There is nothing you need to do. Your automationsAutomations in Home Assistant allow you to automatically respond to things that happen in and around your home. [Learn more] and scriptsA script is a saved list of steps that runs when you start it, for example, from a dashboard, with Assist, or from an automation. Unlike an automation, a script has no triggers, so it doesn’t start by itself. [Learn more] keep working, because Home Assistant still sends actions to the right devices after the split. The only things that might need a second look are automations that point to a device by its ID directly, or the occasional unusual setup. If a repair appears, just follow it.
This is groundwork for more flexible device handling we are building toward over the coming months, so think of it as a step along the way rather than the finished picture.
If you build a custom integrationA custom integration is an integration that has been created by someone from the Home Assistant community and has been published for others to use at their own risk. Custom integrations are not supported by the Home Assistant project. They are not reviewed or tested by the Home Assistant development team and thus may negatively impact the stability of your Home Assistant instance. An example of a custom integration is the Spook integration., most need no changes at all. If yours works with device details directly, the developer blog walks through what changed. There is no rush: the previous approach keeps working for now, so you have plenty of time.
Thanks to @emontnemery for this work.
Last release, purpose-specific triggers and conditions became the friendlier way to build automationsAutomations in Home Assistant allow you to automatically respond to things that happen in and around your home. [Learn more]: you describe the moment you care about, like when the front door opens, instead of piecing it together from the technical parts underneath. This release adds two more of them.
Vibration now has conditions to match its triggers. On top of reacting the moment vibration starts or stops, you can check whether something is vibrating (or not) as part of a bigger automation, for example, only sending a “laundry is done” message once the washing machine has actually stopped shaking.
Moon gains a trigger and matching conditions. You can start an automation the moment the moon enters a new phase, or check the current phase as part of a bigger automation. Point it at the full moon, the new moon, or any change of phase, and let your home take it from there, whether that is mood lighting, a reminder, or just a bit of fun. 🌙
Thanks, @nielsrowinbik!
Thanks to our community for keeping pace with the new integrationsIntegrations connect and integrate Home Assistant with your devices, services, and more. [Learn more] and improvements to existing ones! You’re all awesome 🥰
We welcome the following new integrations in this release:
Dyson Infrared, added by @elax46
Control your Dyson fans through any infrared transmitter you already have set up in Home Assistant. Because the connection only goes one way, Home Assistant shows the last command you sent rather than the fan’s live state.
Fuelprices.dk, added by @MTrab
Track current fuel prices from Danish fuel companies in Home Assistant. The integration pulls prices from the Fuelprices.dk service and creates a sensor for each product you select at a station, so you can watch prices and build automations around them.
Gatus, added by @TN-1, launching at 🥈 silver quality
Bring the health of your services into Home Assistant from your Gatus monitoring instance. Each monitored endpoint shows up as a binary sensorA binary sensor is an entity that reports one of two mutually exclusive states, on or off. The device class determines how those states are labeled in the UI. For example, open/closed for a door or detected/clear for motion. [Learn more], so you can put service status on a dashboard or trigger automations when something goes down or comes back up.
GeoSphere Austria Warnings, added by @tklecka
Bring official weather warnings for Austria into Home Assistant from GeoSphere Austria (formerly ZAMG), the national weather service. Warnings are issued per municipality and cover events like storms, heavy rain, snow, black ice, thunderstorms, heat, and cold, so you can get notified or trigger automations when the warning level rises.
Google Health, added by @allenporter
Bring your health and fitness data into Home Assistant from Google Health and the Fitbit Web API. After you connect your Google account, you get sensors such as steps, distance, weight, and resting heart rate, and it can run alongside the existing Fitbit integration.
Harbor Sleep, added by @Lash-L
Keep an eye on your Harbor Sleep baby monitor from Home Assistant. The integration connects to the device on your local network and exposes sensors like temperature, Wi-Fi strength, and stream quality.
Harman Luxury Audio, added by @sbesh91
Control network streamers built on the Harman Luxury Audio platform, such as the Arcam Radia ST5 and ST60, and equivalent JBL and Mark Levinson streamers. The integration talks to the device directly on your local network, so no cloud account is required.
Karakeep, added by @sli-cka
Connect your self-hosted Karakeep bookmarking service to Home Assistant and keep track of your bookmark statistics. Karakeep helps you save, organize, and tag links, notes, and images, and this integration surfaces those numbers as sensors.
LED Infrared, added by @tr4nt0r
Control LED lights through any infrared emitter you already have set up in Home Assistant. It supports many branded and unbranded bulbs and strip controllers that use generic infrared remotes. Communication is one-way, so the integration uses assumed states.
LiteLLM, added by @luismalves
Use a LiteLLM proxy as a conversation agent in Home Assistant. LiteLLM puts a single OpenAI-compatible API in front of many model providers, so you can reach almost any model through one endpoint, hosted or self-hosted. Home Assistant creates a conversation agent for each model you configure.
llama.cpp, added by @allenporter
Use a local llama.cpp server, or any OpenAI-compatible endpoint, as a conversation agent in Home Assistant. You can set up several agents, each with its own model and instructions, and keep everything running on your own hardware.
Lyngdorf, added by @fishloa, launching at 🥈 silver quality
Control Lyngdorf audio processors and amplifiers from Home Assistant, including power, volume, source selection, and sound modes. The integration keeps in sync with the device over your local network.
Midea, added by @chemelli74
Bring devices that use the Midea protocol, such as air conditioners and air purifiers, into Home Assistant. The integration provides information on the connected devices and lets you control their main features.
NeoPool, added by @svasek, launching at 🥈 silver quality
Monitor and manage pool controllers built on the NeoPool system, originally from Sugar Valley and sold under many brands like Hidrolife, Aquarite, and Oxilife. It talks to your controller locally over Modbus TCP, exposing water chemistry, filtration, and hydrolysis data with no cloud needed.
ScorpionTrack, added by @Herbertmt978, launching at 🥈 silver quality
Follow vehicles shared through a public ScorpionTrack location-share link on your Home Assistant map. The integration reads the shared vehicle feed and creates a device trackerDevice trackers are used to track the presence, or location, of a device. [Learn more] for each vehicle, without needing your private account credentials.
It is not just new integrationsIntegrations connect and integrate Home Assistant with your devices, services, and more. [Learn more] that have been added; existing ones keep getting better too. Here are some of the noteworthy improvements this release:
One thing we are incredibly proud of in Home Assistant is our integration quality scale. This scale helps us and our contributors to ensure integrations are of high quality, maintainable, and provide the best possible user experience.
This release, we celebrate several integrationsIntegrations connect and integrate Home Assistant with your devices, services, and more. [Learn more] that have improved their quality scale:
2 integrations reached platinum 🏆
1 integration reached gold 🥇
5 integrations reached silver 🥈
2 integrations reached bronze 🥉
This is a huge achievement for these integrations and their maintainers. The effort and dedication required to reach these quality levels is significant, as it involves extensive testing, documentation, error handling, and often complete rewrites of parts of the integration.
A big thank you to all the contributors involved! 👏
While most integrationsIntegrations connect and integrate Home Assistant with your devices, services, and more. [Learn more] can be set up directly from the Home Assistant user interface, some were only available using YAML configuration. We keep moving more integrations to the UI, making them more accessible for everyone to set up and use.
The following integrations are now available via the Home Assistant UI:
Time for a little cleaning, and no, we did not wait for spring! The following “integrations”Integrations connect and integrate Home Assistant with your devices, services, and more. [Learn more] are no longer available as of this release:
There are many more improvements in this release; here are some of the other noteworthy changes:
If you have set up Home Assistant recently, you might notice a short, optional survey asking how your first experience went. It is entirely up to you, and every response helps us make getting started smoother for the next person. Thank you to everyone who shares their thoughts! 💛
The template tool in Tools is where you try out “templates”A template is an automation definition that can include variables for the action or data from the trigger values. This allows automations to generate dynamic actions. [Learn more] and watch the result update as you type. This release gives it a more comfortable layout: the editor and the result now sit in a split view you can drag to resize, and you can switch between side by side and stacked, whichever suits what you are working on. Your choice is remembered for next time.
Thanks, @maartenla!
On the picture elements card, a tap could trigger the element next to the one you meant, or hit nothing at all, and some elements could not be tapped. Taps now go to the nearest icon or label, so every element can be reached, and tapping a label’s text always triggers that label. Thanks, @RaHehl!
If you track more than one battery in the energy dashboard, you can now give each one a capacity. The combined state of charge is then weighted by size, so a small full battery and a large empty one no longer average out to a misleading number. Batteries without a capacity set keep using the plain average, so nothing changes unless you want it to. Thanks, @MindFreeze!
Browsing for the right song, photo, or film used to mean clicking through folder after folder. Now, integrationsIntegrations connect and integrate Home Assistant with your devices, services, and more. [Learn more] that provide media can offer search right in the media browser, so you type what you are looking for and jump straight to it.
What you can search depends on the media source. Immich, for example, gained a smart search that finds photos by what is actually in them rather than by their filename, and Overseerr lets you search for and request movies and shows without leaving Home Assistant.
Thanks, @zweckj, @mib1185, and @felixschndr!
Your most-used cards are now easier to find. In the card picker’s “By Card” tab, you can now mark the cards you use most as favorites using the icon in the corner of each card. Favorited cards float to the top of the section, so if you reach for the same card again and again while building similar dashboards, it’s always right there waiting for you. Tap the icon again to remove a card from your favorites.
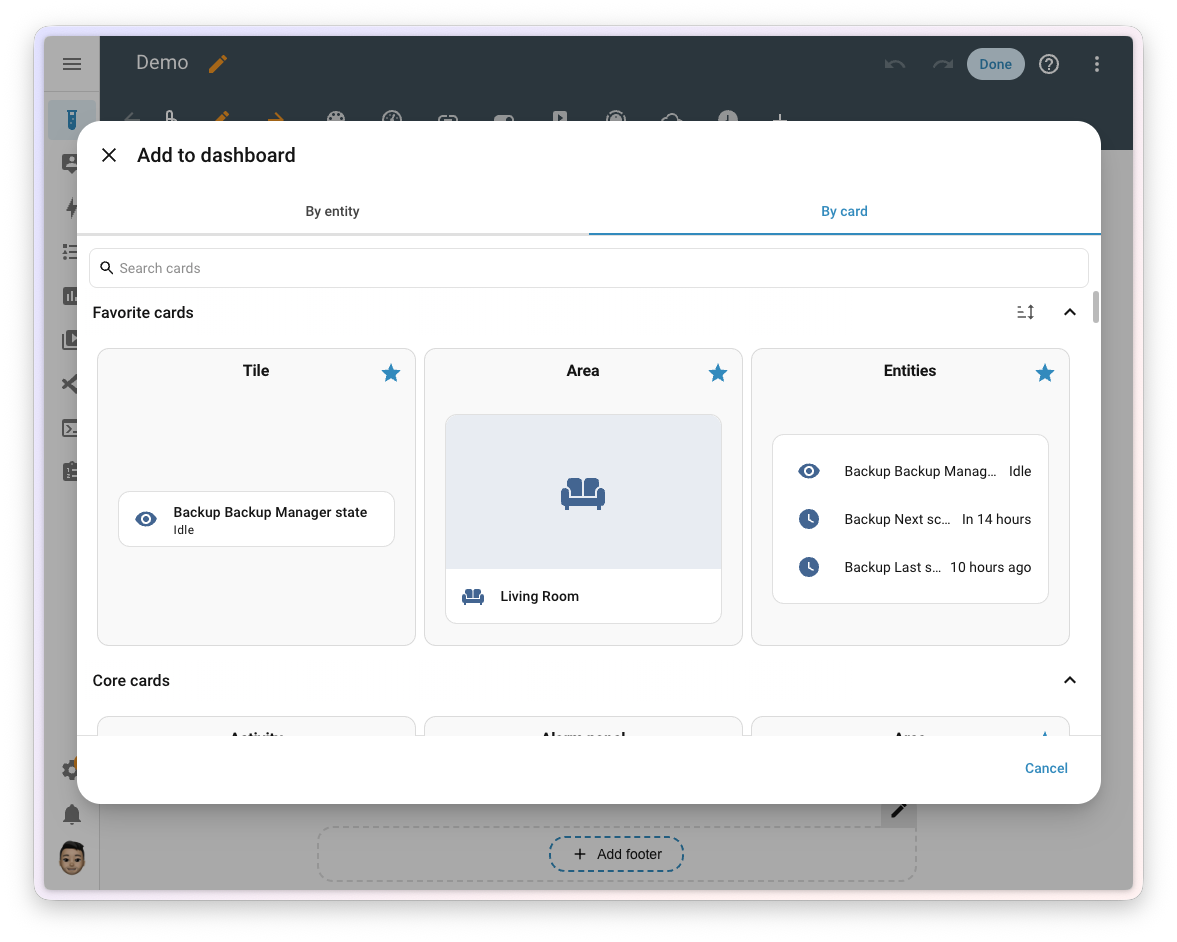
Thanks, @piitaya, @laupalombi, and everyone who suggested this at a Release Party!
Managing who can unlock your Z-Wave lock just got a lot more capable. Powered by Z-Wave JS’s new Access Control API, the Z-Wave JS app 1.6.0 brings a heavily revised interface: every supported lock now gets a dedicated Access Control tab. For now, this lives in Z-Wave JS UI rather than in the Z-Wave panel in Home Assistant.
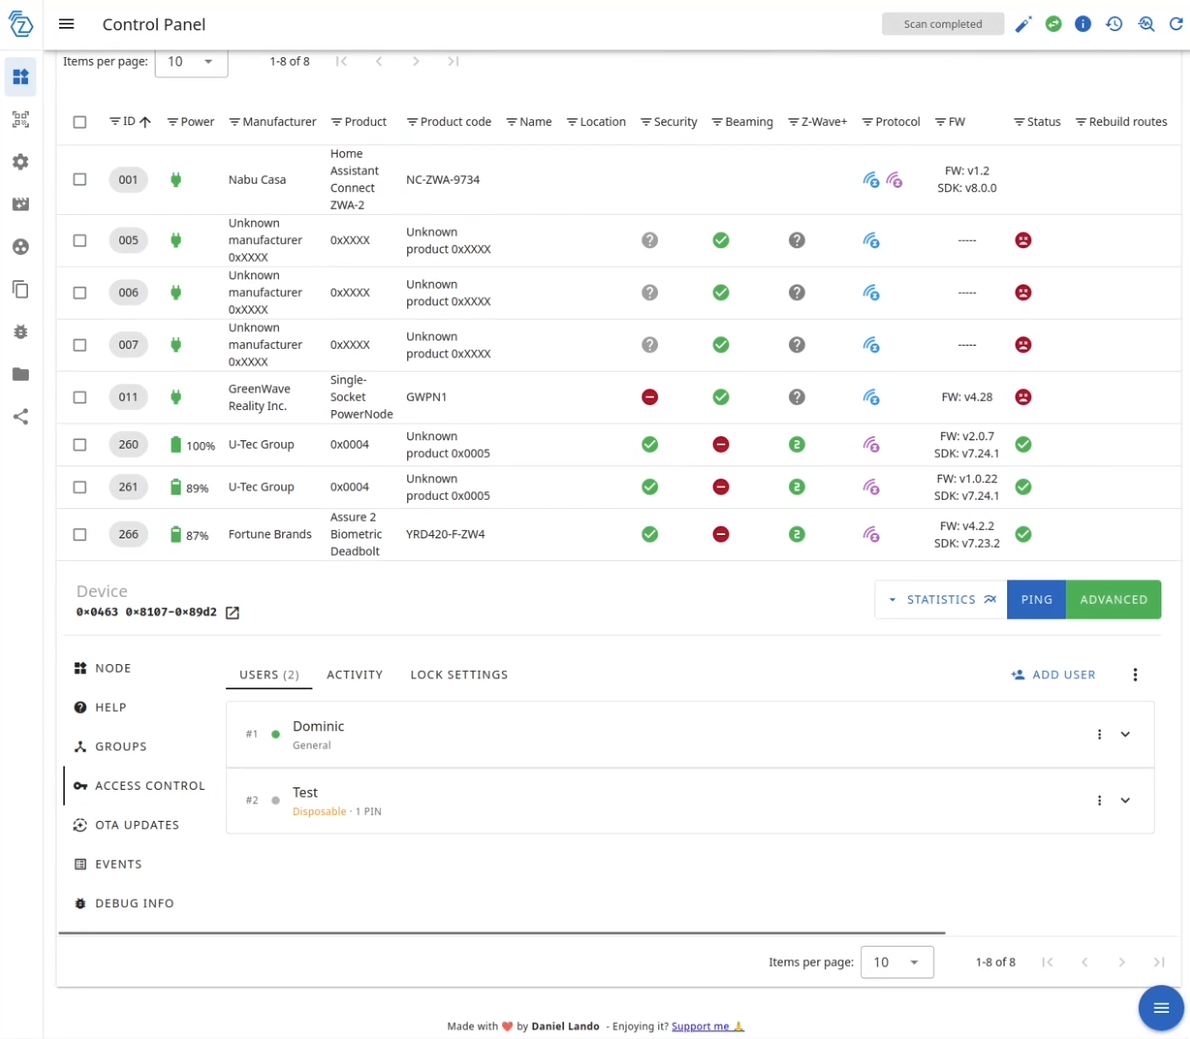 Users, their credentials, and a full audit trail, all in one place.
Depending on what your lock supports, you can now give each user several credentials of more than one type, so the same person can have a PIN and a fingerprint, or multiple of both. New credentials can be learned on the lock itself: start the enrollment from the interface, then present the finger or type the PIN. There is also an audit log of every change, admin code management for locks that use one, and the ability to move credentials between users or delete them in bulk.
Update the Z-Wave JS app to 1.6.0 or later, then open Z-Wave JS UI to find the new tab. Thanks, @AlCalzone!
There is even more packed into this release. Here are some of the other changes worth a mention:
We will also release patch releases for Home Assistant 2026.8 in August. These patch releases only contain bug fixes. Our goal is to release a patch release once a week, aiming for Friday.
handle_safe_area opt-out to panel_custom and fix KNX panel (@farmio - #178598)gameserverip field in Steam Online dataclass (@tr4nt0r - #178751)errors could be None in Shelly Wall Display status (@bieniu - #179207)floor heating mode (@bieniu - #179435)Home Assistant has a great community of users who are all more than willing to help each other out. So, join us!
Our very active Discord chat server is an excellent place to be, and don’t forget to join our amazing forums.
Found a bug or issue? Please report it in our issue tracker to get it fixed! Or check our help page for guidance on more places you can go.
Are you more into email? Sign up for the Open Home Foundation Newsletter to get the latest news about features, things happening in our community, and other projects that support the Open Home straight into your inbox.
If you would like to wear your support: the Open Home Foundation store just added new T-shirts featuring ESPHome, Music Assistant, and a fresh Home Assistant design, all in classic black (or Dark Mode, if you prefer!). They are versatile, built to last, and best of all, every purchase helps fund the foundation’s work. Grab yours from the store.
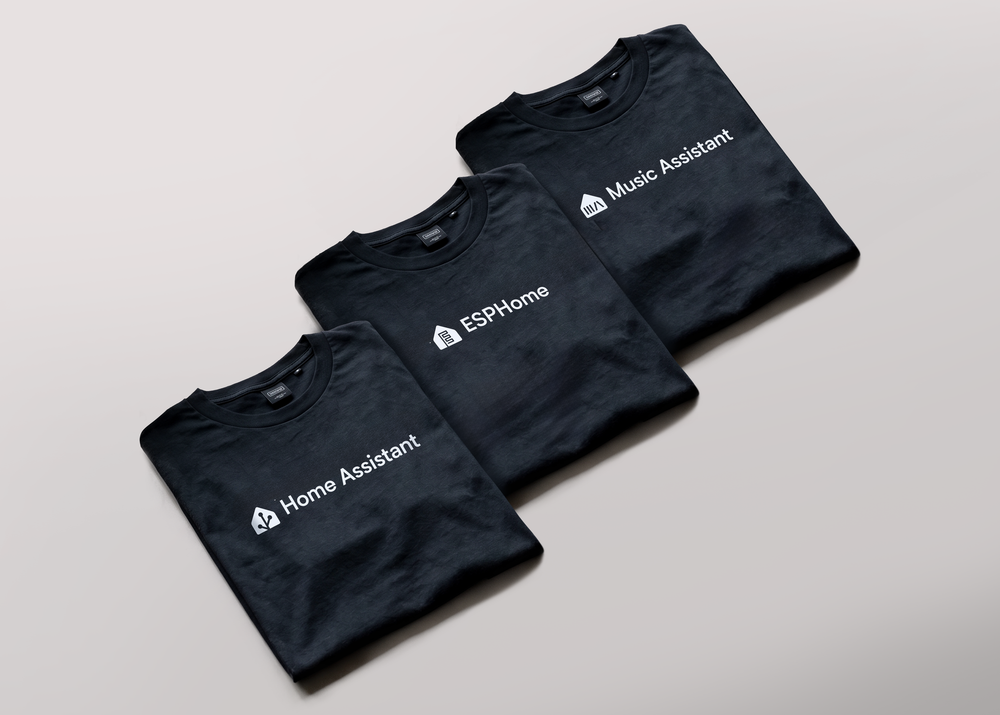
We do our best to avoid making changes to existing functionality that might unexpectedly impact your Home Assistant installation. Unfortunately, sometimes it is inevitable.
We always make sure to document these changes to make the transition as easy as possible for you. This release has the following backward-incompatible changes:
The station radius option has been removed. The 2026 AirNow API no longer uses a distance parameter, so the radius had no effect on which reporting station was used. Existing entries are updated automatically, and any radius you had set is discarded. No action is needed.
The valve’s activation_reason sensor now reports a fixed set of values instead of free-form text. If you have automationsAutomations in Home Assistant allow you to automatically respond to things that happen in and around your home. [Learn more], scriptsA script is a saved list of steps that runs when you start it, for example, from a dashboard, with Assist, or from an automation. Unlike an automation, a script has no triggers, so it doesn’t start by itself. [Learn more], or “templates”A template is an automation definition that can include variables for the action or data from the trigger values. This allows automations to generate dynamic actions. [Learn more] that match on the old text values, update them to match the new ones.
If you set up the Edifier Infrared integration for the R2000DB or R2730DB speakers, some buttons were mapped to the wrong infrared codes (on the R2730DB, power and mute were swapped). The mappings are now corrected and migrated automatically. If you built automationsAutomations in Home Assistant allow you to automatically respond to things that happen in and around your home. [Learn more] or scriptsA script is a saved list of steps that runs when you start it, for example, from a dashboard, with Assist, or from an automation. Unlike an automation, a script has no triggers, so it doesn’t start by itself. [Learn more] around the old, incorrect buttons, update them to match.
The Ohme energy sensor has been removed. It reported an estimate of the energy stored in the car’s battery rather than the energy delivered by the charger, which caused confusing jumps in the energy dashboard, and the vendor’s API no longer provides a useful value.
If you tracked this sensor, use an Integration - Riemann sum helperA helper is a virtual entity you create inside Home Assistant. It is not backed by a physical device. Helpers store values, track state, or do calculations that your automations and dashboards need. [Learn more] on a power sensor to estimate the energy instead.
(@dan-r - #174664) (Ohme documentation)
Paperless-ngx now requires a newer version of your Paperless-ngx server. The minimum supported server version is raised to 2.19, which also restores compatibility with Paperless-ngx 3.0. If your Paperless-ngx server is on version 2.18 or older, update it before you update Home Assistant.
The deprecated battery_level property has been removed from the vacuum entitiesAn entity represents a sensor, actor, or function in Home Assistant. Entities are used to monitor physical properties or to control other entities. An entity is usually part of a device or a service. [Learn more] of several integrations. If you use a robot vacuum’s battery level in an automationAutomations in Home Assistant allow you to automatically respond to things that happen in and around your home. [Learn more], scriptA script is a saved list of steps that runs when you start it, for example, from a dashboard, with Assist, or from an automation. Unlike an automation, a script has no triggers, so it doesn’t start by itself. [Learn more], or on a dashboard, use the vacuum’s battery sensor instead.
This affects the following integrations:
(@gjohansson-ST - #175681, #175684, #175685, #175686, #175687, #175688, #175691, #175764)
The option to configure the pollingData polling is the process of querying a device or service at regular intervals to check for updates or retrieve data. By defining a custom polling interval, you can control how frequently your system checks for new data, which can help optimize performance and reduce unnecessary network traffic. [Learn more] interval has been removed from ScreenLogic. Home Assistant now polls the integration at a fixed interval. If you need a different update frequency, you can set your own polling interval or trigger an update with the homeassistant.update_entity action.
Support for UniFi Protect AI Port devices has been removed. These devices only ever exposed diagnostic sensors, all disabled by default, and are not part of the UniFi Protect public API the integration is moving to. The AI Port device and its sensors are removed automatically when you update. You can still configure the AI Port directly in UniFi Protect.
(@RaHehl - #174378) (UniFi Protect documentation)
Detection scores are no longer available. The detection binary sensors (motion, person, vehicle, animal, and the smart-audio alarm sensors) now take their state from the UniFi Protect public API, which carries no per-event score, so their event_score attribute is gone and automations that filter on it need another condition. The event id and the detected types moved to the new Motion detection, Smart detection, and Sound detection event entities.
(@RaHehl - #174948) (UniFi Protect documentation)
UniFi Protect 7.1 or newer is now required. On an older console the integration reports that the version is too old instead of setting up. Update UniFi Protect to 7.1 or newer to keep using it.
The Volvo On Call integration has been removed. If you have a supported Volvo, set up the newer Volvo integration instead.
If you are a custom integration developer and want to learn about changes and new features available for your integration: Be sure to follow our developer blog. The following changes are the most notable for this release:
Of course, there is a lot more in this release. You can find a list of all changes made here: Full changelog for Home Assistant Core 2026.8.
Something big just happened. As the Open Home Foundation’s Android developer for Home Assistant, I was invited by the European Commission to consult on Android interoperability. On July 16, 2026, the Commission adopted a decision requiring Alphabet to open up eleven Android features — including always-on wake word detection, ambient sensor access, and screen automation — to all assistants, on equal terms.
The Open Home Foundation fights for privacy, choice, and sustainability. These principles are at the heart of everything we do, including how we handle website analytics. Our position is clear: we reject tools that track individuals across the web to monetize their data. Instead, we want aggregated, anonymized analytics that show how our websites are performing overall — without identifying who our visitors are, or compromising their privacy.

Sound the alarm, because Works with Home Assistant just welcomed our newest partner to the program: FireAvert! 🎉 Specialists in fire safety, FireAvert are on a mission to keep you and your home out of harm’s way. They bring the very first gas and electric appliance shutoff devices to the program, and with them, a whole lot of peace of mind.
As ex-firefighter Peter Thorpe knows too well, a moment of forgetfulness is all it takes for a kitchen to end up in flames. And after close to twenty years of service witnessing the same devastating scenario repeat itself, he knew something had to be done. So he founded FireAvert, launching with the Auto Stove Shutoff for electric stovetops.
The device was already gaining momentum before FireAvert’s pitch caught the attention of Shark Tank, and for good reason. They say there’s no smoke without fire, but years on the job taught Thorpe that in the kitchen, that isn’t always the case. Smoke can build well before a flame takes hold – and that’s the window FireAvert’s shutoff works in. By listening for your standard smoke alarm, the device automatically shuts off your stove when the alarm sounds – cutting the heat at the source before a fire can catch.
“Excited to see FireAvert join the Home Assistant community. Smart homes shouldn’t just be convenient – they should help keep families safer too. This is exactly the kind of innovation the ecosystem needs.”
- Chasen Tolbert, FireAvertSince their launch, FireAvert’s range has expanded to include gas stove and small appliance shutoffs (think microwaves, air fryers, hot plates), so whatever’s most likely to be left on in your kitchen, there’s a shutoff for it. And with Z-Wave units now among them, it’s easier than ever to bring that protection straight into your Home Assistant setup.
The FireAvert shutoffs joining the program run on Z-Wave. For anyone unfamiliar, here’s a quick rundown: Z-Wave is an open smart home protocol that allows your devices to talk to each other regardless of the brand, without locking you into one ecosystem. It’s also a mesh network, where each device relays signals for the others to extend coverage across your home, reinforcing your connection.
While Z-Wave wasn’t a part of FireAvert’s initial product line, since then we’ve been pleased to see the company prioritize local control by producing shutoff devices with the open standard, and certifying them with the Z-Wave Alliance. We first met the FireAvert team at a San Diego alliance meeting back in 2025, and it was clear from the get-go that we were on the same wavelength: driven to build open, interoperable smart home tech that doesn’t require a cloud to keep your home protected.
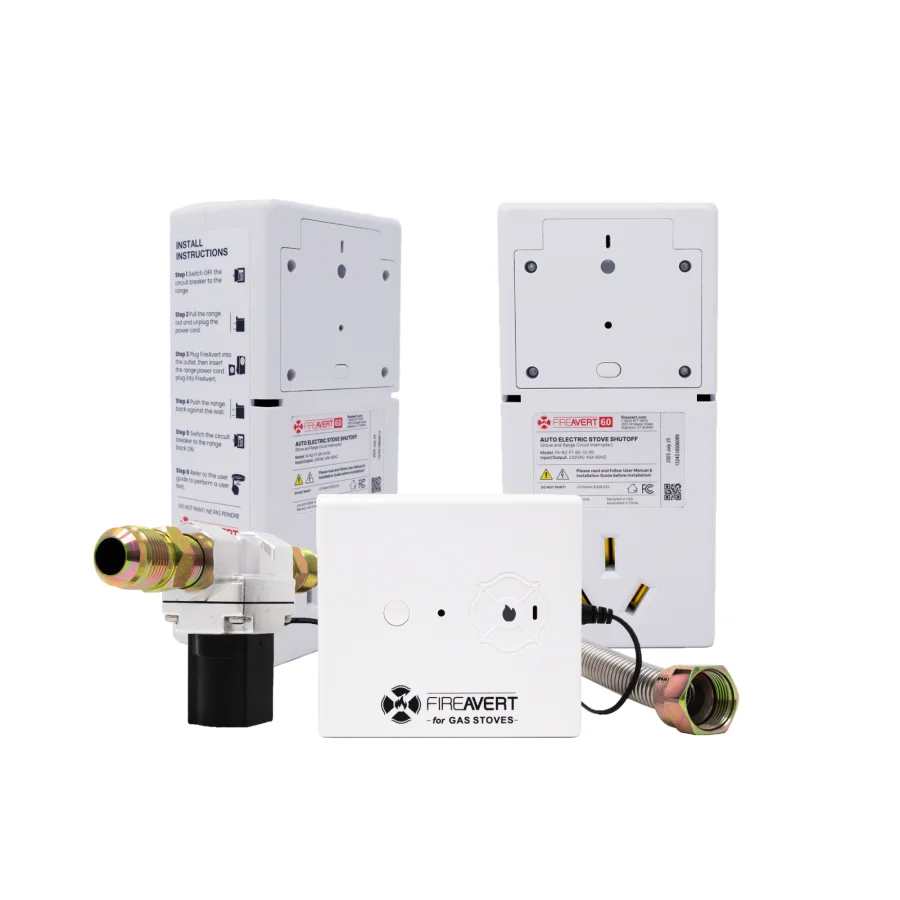 FireAvert automatic shutoffs for electric and gas stoves
It’s important to note that FireAvert’s shutoffs don’t rely purely on Z-Wave to do their job, and they’ll keep protecting your kitchen even if your network drops out entirely. That kind of safety net is reassuring for anyone, but even more so for those with caring responsibilities or aging relatives to worry about.
Likewise, FireAvert’s shutoffs don’t depend on a battery to function: just plug your stove or small appliance into the shutoff device, and the device into your wall socket – and you’re all set. As long as your appliance has power, the shutoff is on duty. And FireAvert back up that dependability where it counts: all four devices come with a lifetime warranty, and are independently tested to CSA and UL standards – confirming the hardware meets strict, recognized electrical safety requirements.
Just like every device certified by the Works with Home Assistant program, FireAvert’s shutoffs have also been rigorously tested by our in-house team to ensure they are up to code with our core requirements of local control and privacy.
Check out the devices that made the grade:
But it’s not just about adding devices to a list – our community is the engine of everything we do, and by joining it FireAvert commits to providing long-term support to make certain their devices continue to work smoothly within your setup.
While there are already certified water shutoff devices in the program, stove shutoffs are a first, bringing a brand-new category of safety tech to Home Assistant users. It’s exactly the kind of innovation we love to see: more ways for our community to manage their smart homes, on their own terms.
That expansion is core to what the Open Home Foundation – which operates the Works with Home Assistant program – is about: keeping smart homes local, private, and safe. If you’d like to see more safety-focused partners like FireAvert join the program, consider subscribing to Home Assistant Cloud or buying official hardware like the Home Assistant Connect ZWA-2. Every bit of support helps us expand and maintain the program for all ⚒️.
Forged to protect the community, FireAvert are a natural match for ours. We’re thrilled to have them join the ranks, and excited for Home Assistant users to be able to add another line of defense for their smart homes, and the people and pets who live in them. Head to our certified device list to discover the full range of devices to safeguard your home.
Q: If I have a device that is not listed under Works with Home Assistant does this mean it’s not supported?
A: No! It just means that it hasn’t gone through a testing schedule with our team or doesn’t fit the requirements of the program. It might function perfectly well but be added to the testing schedule later down the road, or it might work under a different connectivity type that we don’t currently test under the program.
Q: OK, so what’s the point of the Works with program?
A: It highlights the devices we know work well with Home Assistant and the brands that make a long-term commitment to keeping support for these devices going. The certification agreement specifies that the devices must have the functionality you would expect within Home Assistant, operate locally without the need for the cloud, and that they will continue to do so long term.
Q: How were these devices tested?
A: All devices in this list were tested using a standard Home Assistant Green Hub with the Home Assistant Connect ZWA-2 as the Z-Wave adapter and with our Z-Wave integration. If you have another hub/adapter/integration that’s not a problem but we test against these as they are the most effective way for our team to certify within our ecosystem.
Q: Will you be adding more FireAvert devices to the program?
A: Why not! We’re thrilled to foster a close relationship with the team at FireAvert to work together on any upcoming releases or add in further products that are not yet listed here.
Hi,
The OpenWrt community is proud to announce the newest stable release of the OpenWrt 24.10 stable series.
This release fixes many security issues, several of them remotely triggerable in network services that are enabled by default. We strongly recommend everyone to upgrade.
The OpenWrt 24.10 series is in security maintenance (only security problems are fixed), with end of life (EoL) projected for September 2026. We recommend migrating to OpenWrt 25.12 before then.
Download firmware images using the OpenWrt Firmware Selector:
Download firmware images directly from our download servers:
Only the main changes are listed below. See changelog-24.10.8 for the full changelog.
This release fixes several remotely triggerable vulnerabilities in core network
services that are enabled by default. Updating is strongly recommended.
uh_urldecode(), an off-by-one out-of-bounds read in uh_b64decode(), constant-time password comparison and stricter handling of $p$ crypt-hash entries in the authentication realm.file plugin matched ACL grants against the textual path but then followed symlinks unchecked, so a symlink inside an ACL-covered directory let a limited account read or write arbitrary root-owned files. The path is now re-resolved and re-authorized for every operation that dereferences the final component./etc/shadow).lookup_host, dns_server and the section name to system() as an unquoted shell string, so anyone able to write DDNS configuration could execute commands as root. The invocations now use the array form of system().smbd in general rather than only smbd -V, allowing read-only accounts to run arbitrary commands as root./proc paths that are symlinks (such as /proc/mounts) keep working.handle_send_a() allowed an unauthenticated attacker on the local segment to crash the daemon with a single crafted packet.scp client overwrite unexpected local files (missing OpenSSH patch). Note the accompanying upstream behaviour change: scp -r is now rejected when the target directory already exists.scp did not clear setuid/setgid bits on received files.authorized_keys forced_command option when dropbear runs with -t; authorized_keys is now opened non-blocking (local denial of service via special files); and a close() on a file descriptor obtained from an out-of-bounds read was fixed.iconv) and CVE-2026-40200 (stack corruption in qsort with sufficiently large inputs).In addition, the packages feed shipped with this release moved a number of
optional packages to newer upstream versions that contain security fixes, among
them curl (8.12.1 to 8.19.0), expat (2.7.4 to 2.8.2), BIND (9.20.23 to 9.20.26),
PHP 8 (8.3.29 to 8.3.32), Tor (0.4.8.22 to 0.4.9.10), unbound (1.24.2 to 1.25.1),
lighttpd (1.4.82 to 1.4.85), haproxy (3.0.19 to 3.0.25) and rsync (3.4.2 to 3.4.3).
collectd also received a fix for a use-after-free in the ping plugin. These
packages are not part of the default images — you have to update the installed
packages on your device to receive them.
Beyond the issues listed above, this release fixes a number of further security
and robustness problems in odhcpd, odhcp6c, rpcd and uhttpd for which no CVE
number or dedicated advisory was assigned. We strongly recommend upgrading to
the latest OpenWrt release and installing all available package updates.
No new devices were added in this security maintenance release.
Device fixes:
/tmp, so it is lost on reboot. The location can be changed in /etc/profile.d/busybox-history-file.sh.Sysupgrade can be used to upgrade a device from 23.05 to 24.10, and configuration will be preserved in most cases.
For for upgrades inside the OpenWrt 24.10 stable series for example from a OpenWrt 24.10 release candidate Attended Sysupgrade is supported in addition which allows preserving the installed packages too.
Sysupgrade from 22.03 to 24.10 is not officially supported.
There is no configuration migration path for users of the ipq806x target for Qualcomm Atheros IPQ806X SoCs because it switched to DSA. You have to upgrade without saving the configuration.
''Image version mismatch. image 1.1 device 1.0 Please wipe config during upgrade (force required) or reinstall. Config cannot be migrated from swconfig to DSA Image check failed''
User of the Linksys E8450 aka. Belkin RT3200 running OpenWrt 23.05 or earlier will need to run installer version v1.1.3 or later in order to reorganize the UBI layout for the 24.10 release. A detailed description is in the OpenWrt wiki. Updating without using the installer will break the device. Sysupgrade will show a warning before doing an incompatible upgrade.
Users of the Xiaomi AX3200 aka. Redmi AX6S running OpenWrt 23.05 or earlier have to follow a special upgrade procedure described in the wiki. This will increase the flash memory available for OpenWrt. Updating without following the guide in the wiki break the device. Sysupgrade will show a warning before doing an incompatible upgrade.
Users of Zyxel GS1900 series switches running OpenWrt 23.05 or earlier have to perform a new factory install with the initramfs image due to a changed partition layout. Sysupgrade will show a warning before doing an incompatible upgrade and is not possible. After upgrading, the config file /etc/config/system should not be restored from a backup, as this will overwrite the new compat_version value.
Users of scp from the dropbear package: recursive copies (scp -r) into an already existing target directory are now rejected. This is an intentional upstream change that comes with the fix for CVE-2019-6111. Use rsync or copy into a non-existing directory instead.
Full release notes and upgrade instructions are available at
https://openwrt.org/releases/24.10/notes-24.10.8
In particular, make sure to read the regressions and known issues before upgrading:
https://openwrt.org/releases/24.10/notes-24.10.8#known_issues
For a detailed list of all changes since 24.10.7, refer to
https://openwrt.org/releases/24.10/changelog-24.10.8
To download the 24.10.8 images, navigate to:
https://downloads.openwrt.org/releases/24.10.8/targets/
Use OpenWrt Firmware Selector to download:
https://firmware-selector.openwrt.org?version=24.10.8
As always, a big thank you goes to all our active package maintainers, testers, documenters and supporters.
Have fun!
The OpenWrt Community
To stay informed of new OpenWrt releases and security advisories, there
are new channels available:
a low-volume mailing list for important announcements:
https://lists.openwrt.org/mailman/listinfo/openwrt-announce
a dedicated "announcements" section in the forum:
https://forum.openwrt.org/c/announcements/14
other announcement channels (such as RSS feeds) might be added in the
future, they will be listed at https://openwrt.org/contact

Ever since we introduced the idea of a community-powered device database at State of the Open Home 2025, our goal has been clear: create a “Wikipedia of smart home devices” based on real-world usage. In February, we took the first step by inviting Home Assistant users to voluntarily share anonymized device data to help us build it.

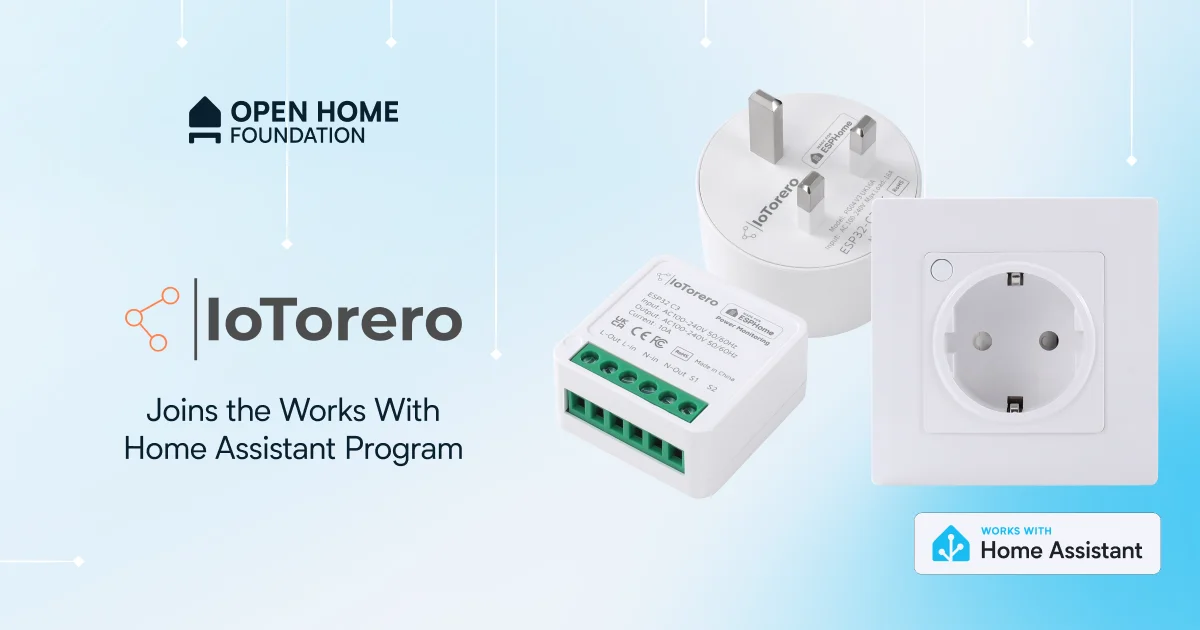
The Works with Home Assistant program powers up this month as we welcome our new partner, IoTorero! 🎉 Experts in pre-flashed smart home hardware, IoTorero bring the very first ESPHome-ready smart plugs and relays to the program (and that’s not all).
If you’ve spent any time browsing pre-flashed smart home tech online, there’s a good chance you’ve come across IoTorero. And if you haven’t, let us introduce you! Founded in 2020, the company (formerly Athom Technology) was tinkering with ESPHome right out of the gate. Their new name is a nod to the Internet of Things (IoT), but unlike standard IoT gadgets that stop working if your internet drops or a company closes its servers, IoTorero champion open source firmware.
Other smart devices run manufacturer-written software, which is tuned to work well with Home Assistant for certification to the program. IoTorero go a step further to make sure their tech is accessible for all: all seven of their certified devices are pre-flashed with ESPHome, meaning there’s no installation required – the devices will integrate into your Home Assistant setup straight out of the box. And because their devices are genuinely open, you can always tweak and customize them if you want to.
“Since inception in 2020, IoTorero (Athom Technology) has been dedicated to the research, development, and manufacturing of open source smart home hardware products. We provide Home Assistant users with high-quality devices pre-flashed with ESPHome firmware. By joining the Works with Home Assistant program, we ensure that customers can select and purchase our products with complete confidence.”
- Aiden Tang, CTO and Co-Founder, IoToreroThat same spirit of openness carried over to last year’s Community Day, where IoTorero donated a stack of samples for attendees to try – a gesture we loved to see, and one that speaks to how seriously they take supporting our community 💪. It shows up in their approach to code, too: IoTorero maintain a public GitHub repository of configs for all their devices, free for anyone to learn from or build on.
Speaking of community, the development of projects like ESPHome from the Open Home Foundation is supported by Home Assistant Cloud subscribers and anyone who purchases Home Assistant hardware. While all of IoTorero’s devices work locally, if you’re interested in remote access – for example to check your energy use or open the garage door from a distance – check out Home Assistant Cloud.
For anyone new to it, ESPHome is a powerful platform that allows smart home devices to operate completely locally via the chip inside, with no cloud required. Because IoTorero’s devices arrive pre-flashed, you get all that local power without having to learn how to build or compile firmware yourself. And it just got a major upgrade. The ESPHome team recently released a new UI and Device Builder, swapping the old code editor-inspired dashboard for a visual workspace that can suggest components and layouts as you build.
Since IoTorero’s devices arrive pre-flashed, there’s nothing to set up in advance: just connect them, and they’ll show up in Home Assistant like any other device, ready to control and automate from your normal dashboard. The ESPHome Device Builder is there if you ever want to go further: it allows you to do things like renaming a device or tweaking its config, without needing to touch any code… unless you want to. Whether you’re new to the arena or a seasoned pro, it means a lot less guesswork (and a lot more fun!).
Every device that earns Works with Home Assistant certification goes through our in-house testing process, checked against our core requirements of local control, privacy, and long-term support – and IoTorero meets that bar across the board. Their devices also carry the Made for ESPHome certification, a separate badging program and prerequisite for any ESPHome devices joining Works with Home Assistant.
Here’s the full list of IoTorero’s certified devices:
Sustainability is one of the Open Home Foundation’s core principles, and IoTorero’s ESP32-C3 plugs are a great example of what that looks like in practice. They turn an ordinary appliance into something smart and measurable, with all four regional variants monitoring voltage, current, power, and total consumption – making it easy to spot energy waste and cut your home’s carbon footprint, as well as your bill.
The Power Monitoring Mini Relay brings that same convenience to hardwired setups. At roughly the size of a matchbox, it’s small enough to tuck behind a wall switch or inside a cabinet, and it’s built for switch control, garage and appliance automation, and other local smart home workflows a standard plug can’t reach.
Another nifty feature across IoTorero’s devices is that they double as Bluetooth proxies. This means they pick up signals from nearby Bluetooth low-energy (BLE) devices and pass them on to Home Assistant, extending your Bluetooth range without having to buy an extra, dedicated device. The Open Home Foundation’s recent blog post, Proxy all the things: no device left behind, explains why this is so important: turning everyday hardware into a “bridge” for other devices means getting more out of what you already own, instead of buying something new for every job. And one less gadget to buy means one less device ending up as e-waste ♻️.
As one of ESPHome’s earliest adopters, IoTorero have well and truly earned our formal badging, and we’re thrilled to bring their devices to the Home Assistant community – tested, certified, and ready to make the path from unboxing to automating that much smoother. Check out the full lineup of IoTorero’s devices, along with the full range of Works with Home Assistant-compatible tech over at our certified device list.
Q: If I have a device that is not listed under Works with Home Assistant does this mean it’s not supported?
A: No! It just means that it hasn’t gone through a testing schedule with our team or doesn’t fit the requirements of the program. It might function perfectly well but be added to the testing schedule later down the road, or it might work under a different connectivity type that we don’t currently test under the program. We do not certify anything that relies on cloud control.
Q: OK, so what’s the point of the Works with program?
A: It highlights the devices we know work well with Home Assistant and the brands that make a long-term commitment to keeping support for these devices going. The certification agreement specifies that the devices must have the functionality you would expect within Home Assistant, operate locally without the need for cloud and that they will continue to do so long-term.
Q: How were these devices tested?
A: All devices in this list were tested using a standard Home Assistant Green as a hub and using the ESPHome integration. If you have a different set-up that’s not a problem, but we test against these as they are the most effective way for our team to certify within our ecosystem.
Q: Will you be adding more IoTorero devices to the program?
A: Why not! We’re thrilled to foster a close relationship with the team at IoTorero to work together on any upcoming releases or add in further products that are not yet listed here.
We’re updating which Apple platforms the Home Assistant Companion app supports, and because transparency is core to how we work, we want to be upfront about what’s changing.
Starting with version 2026.8.0 of the Companion app, we will no longer support iOS 15, watchOS 8, or macOS 11. The last supported version for these platforms will be 2026.7.1.
Here’s everything you need to know:
At Home Assistant, we’re committed to helping you use your devices for the long haul. We know your hardware is something you rely on every day, which is why we try to keep the Companion app running on older devices for as long as possible. However, supporting older OS versions indefinitely comes at a cost, limiting our ability to adapt to modern technology.
From September this year, Apple’s developer tools will officially stop supporting watchOS 8 and macOS 11, making it technically difficult for us to keep building for them. With less than 1% of our users currently running these older OS versions, this update allows us to future-proof the Companion app for the vast majority of our community.
By focusing our efforts on current operating system versions, we can keep our codebase maintainable for the long term. This shift removes some long-standing constraints, since older OS versions had been limiting our ability to make UX, stability, and performance improvements, including adding features such as Apple Watch complications and more advanced widgets.
A recap of what’s changing:
Importantly, this doesn’t mean your older iOS devices will become unusable. You can still control your home using the Home Assistant frontend in your device’s web browser, which remains fully supported and receives regular monthly updates.
The last compatible Companion app version (2026.7.1) will also remain available on the App Store, and the source code will stay accessible on GitHub for any users who want to compile the app themselves.
This update means a stronger, more capable Companion app for everyone going forward, and it’s part of how we keep Home Assistant evolving. We appreciate your understanding and support through this change, and are looking forward to building what’s next.
Tip
Don’t forget to join our release party live stream on YouTube on July 1, 2026, at 20:00 GMT / 12:00 PT / 21:00 CET!
Home Assistant 2026.7! 🎉
This is one of those releases I’ve been looking forward to for a long time. My favorite by far is what we’ve done with automations. Purpose-specific triggers and conditions graduate from Labs and become the new default for everyone. 🎉
It comes down to something we’ve been chasing for years: more power, less complexity. Instead of starting from Home Assistant’s internals, which entity, which state, which kind of trigger, you start from what you actually want your home to do. When the bedroom drops below 18°C, turn on the heating. That’s it. No technical traps, no quirks to memorize. And because integrations can teach the automation engine their own triggers and conditions, it only gets better from here. All of it right there in our beautiful user interface.
The nice thing is, nothing breaks. All your existing automations keep working, worry-free. We’ve also written tons of great documentation explaining every single trigger, condition, and action, with examples to learn from. And if you’re one of those people who prefers writing automations in YAML instead of the UI, you’re in for an amazing experience too. User experience is not a synonym for “the UI”. YAML users deserve good user experience too.
But honestly? I’ve got a second favorite this release, and that surprised me a little. Activity, what many of you still know as the logbook, has been rebuilt into a slick and clean timeline. 😍 It reads top to bottom like a feed, groups entries by day, and finally speaks the same language as the rest of Home Assistant. I keep opening it just to look at it.
And that’s just the start. There’s a new update-all button, dedicated panels for infrared and radio frequency, an overhauled ZHA Zigbee device management, and 10 new integrations from our community.
One more thing before you dive in: the Open Home Foundation is exhibiting at IFA Berlin for the first time, from September 4 to 8, 2026. We’d love to meet you there, so come say hello. There’s also a community meetup on Sunday, September 6, and everyone’s welcome. You can read all about it here.
Enjoy the release!
../Frenck
A huge thank you to all the contributors who made this release possible! And a special shout-out to @piitaya, @sairon, and @agners who helped write the release notes this release. Thanks to them, these release notes are in great shape. ❤️
This is, hands down, one of the biggest and best changes we’ve made to the automation editor in years. It has been roughly eight months in the making, built and refined release after release by a lot of people, and shaped by a mountain of your feedback along the way. As of this release, it is here for everyone, and we could not be more excited to finally hand it over.
Why are we this excited? Because automations have always asked you to meet Home Assistant halfway. Some people still talk about it like you need YAML, a coding background, and a free evening just to automate a light. That hasn’t been true for a while, and this release takes the biggest step yet toward closing that gap for good.
Back in Home Assistant 2025.12, we introduced purpose-specific triggers and conditions in Settings > System > Labs. Every release since has added more of them and polished the experience. This release, they graduate: this new way of building automationsAutomations in Home Assistant allow you to automatically respond to things that happen in and around your home. [Learn more] is out of Labs and becomes the new default for everyone. 🎉
It is tempting to read this as a nicer set of menu options. It is much more than that. It is a different starting point: you describe what you want your home to react to, rather than starting from the technical building blocks underneath.
An automation engine thinks in primitives. People don’t. You think “when the front door opens”, “when the last person leaves”, or “when a battery runs low”.
The old path started somewhere else, with Home Assistant’s internals. Which entity? Which state? Does it become on, detected, home, or not_home? Do I need a state trigger, a numeric state trigger, a device trigger, or a system event? If you know Home Assistant well, those questions are second nature. If you don’t, they are the wall you hit before you even start. 😤
The new triggers and conditions speak the language of the thing you care about. When the bedroom drops below 18°C, turn on the heating. You don’t think about numeric state triggers, attributes, or units. You pick Temperature crossed threshold and say what matters. Or Battery low: no need to know whether a device reports its battery as a percentage sensor, or what counts as “low”. You build around the moment itself.
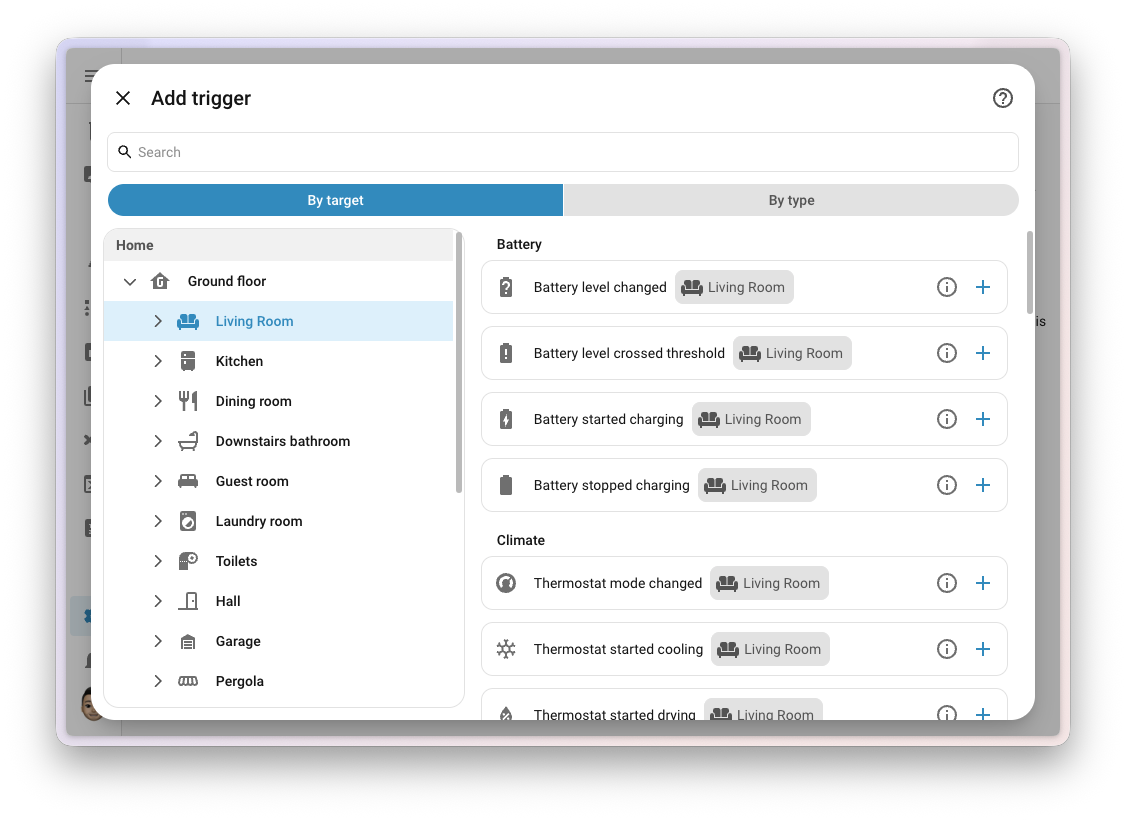
The new building blocks also support targets, and that is a bigger deal than it sounds.
You can build an automationAutomations in Home Assistant allow you to automatically respond to things that happen in and around your home. [Learn more] around motion in the living room, instead of around one specific motion sensor. One sensor in that room, fine. Ten, also fine. Swap one out next year, add another, or remove the one that kept seeing the cat, and the automation keeps describing the same intent: motion in the living room.
When motion is detected outside, turn on the lights outside. The trigger points at the outside areaAn area in Home Assistant is a logical grouping of devices and entities that represents a room or space in your home, such as the living room, kitchen, or garage. [Learn more], the action points at the outside lights. Change which sensors or lights live there later, and the automation follows along. It reads like a sentence, and it is one less fragile list of entities to maintain forever.
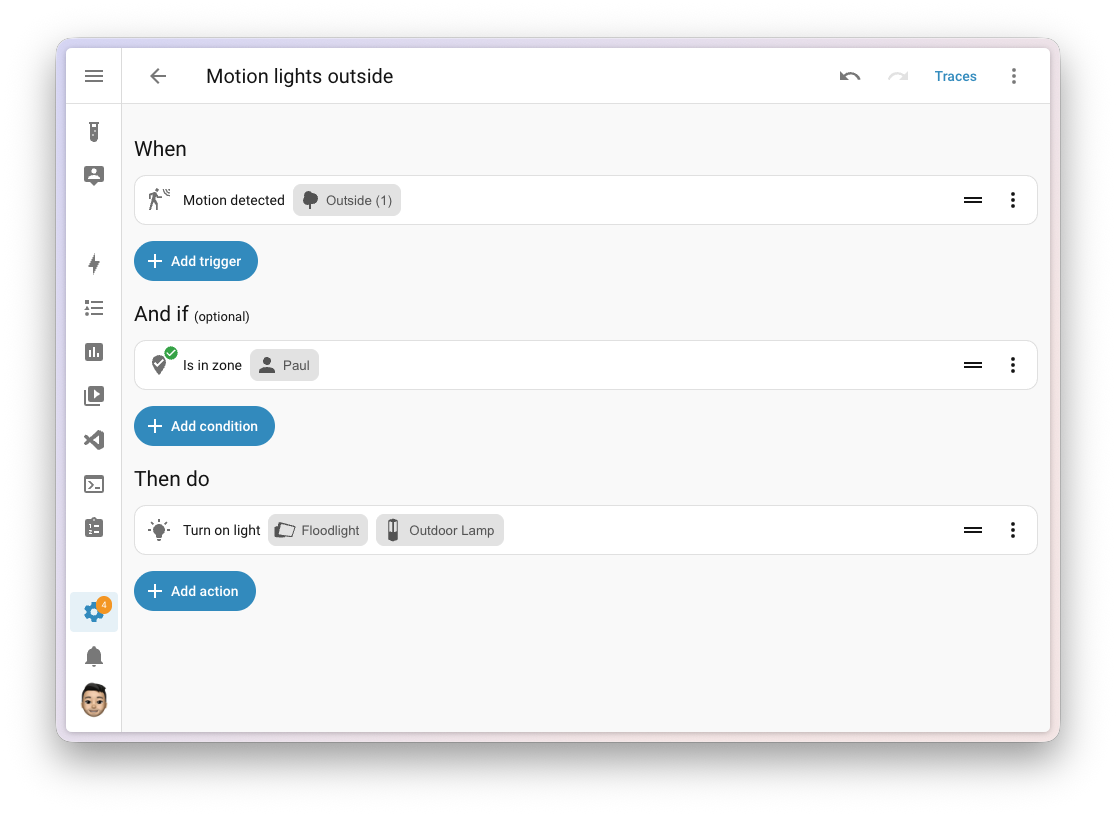
Here is the part that is easy to miss: this isn’t just a friendly wrapper around the old triggers.
These triggers and conditions can be extended by integrationsIntegrations connect and integrate Home Assistant with your devices, services, and more. [Learn more], including custom and community ones. Integrations have long been able to add their own actions; now they can add their own triggers and conditions too. Picture a washing machine integration offering a plain “laundry is done” trigger, with no need to know which state value or attribute actually means finished. An integration knows things you would otherwise have to figure out yourself: which state changes matter, which to ignore, which edge cases are normal, and what a useful automation moment looks like in its world.
A sensor can tell you the electricity price. The integration can tell you when the price is lowest today. Instead of everyone rebuilding the same template, or learning the quirks of one particular heat pump, EV charger, or alarm panel, the integration can offer the triggers, conditions, and actions that make sense for it. That turns the automation engine into something integrations can teach. It is where “more power, less complexity” stops being a slogan.
There is a quieter benefit too: No technical traps. 💪
With these new triggers, you don’t need to care about unknown or unavailable states. The building block handles those in the way that makes sense for its purpose. The moment you have to decide whether one specific automation should ignore unavailable, wait it out, or treat it as false, we have already made you think about the wrong thing.
Event entities are another classic. Automate around one with a plain state trigger and you may discover it doesn’t fire the second time the same event happens, because the state didn’t change the way you expected. A purpose-specific trigger expresses the event directly, so that whole class of surprise simply goes away.
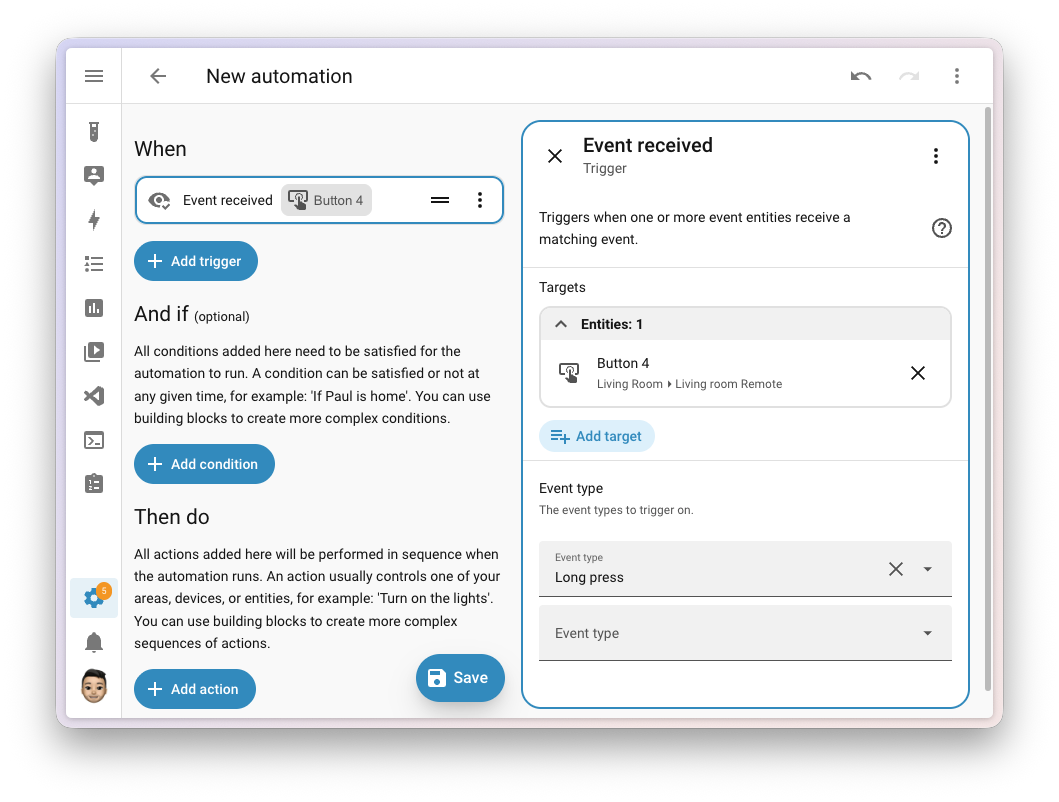
Before anyone opens a forum thread in mild panic: no, you don’t need to rewrite anything.
Existing automations keep working. Generic triggers, conditions, templates, and YAML all keep working. The new triggers and conditions are simply the better starting point for the next automation you build, and a nicer option when you decide to improve an old one. It is not a migration tax.
And this isn’t Home Assistant walking away from YAML. We put real effort into making the new building blocks read well in YAML too, the same way we did when automations moved to triggers, conditions, and actions and swapped service for action. If text is your interface, it should feel just as natural. If you use YAML to write automations, we are sure you’ll love the new triggers and conditions just as much!
We also did the less flashy work, which on a project like this is often the work that matters most. Every trigger, condition, and action now has its own documentation page over at triggers, conditions, and actions. Each one explains what the building block is, when you would reach for it, how to use it from the automation editor, how it looks in YAML, and includes real examples to learn from.
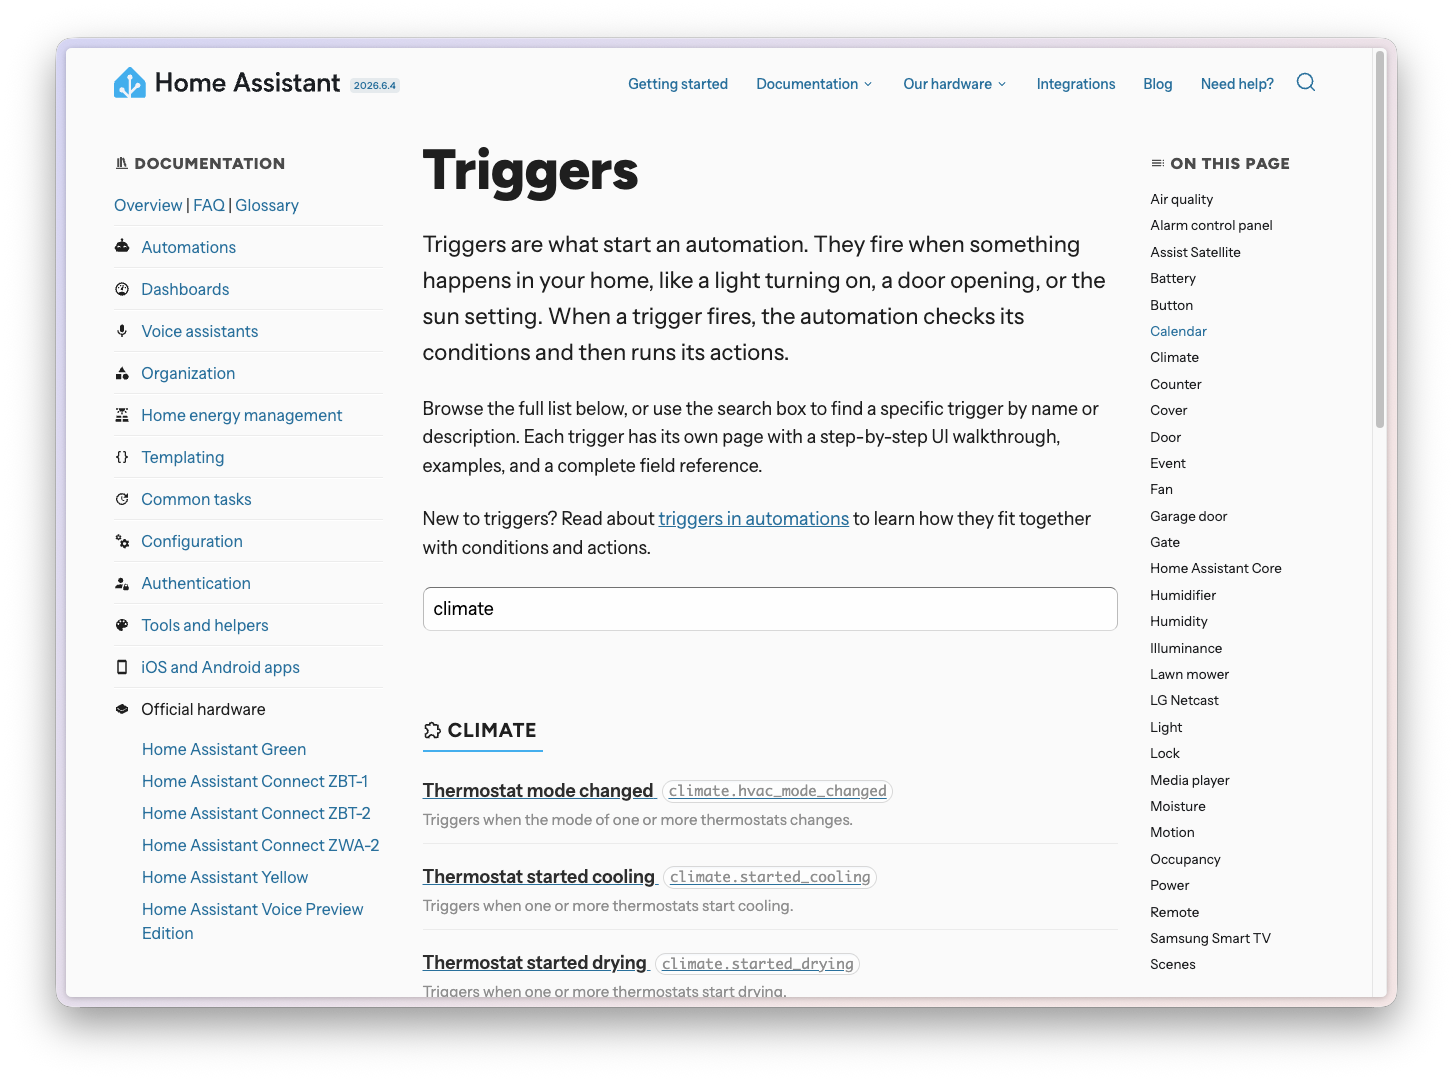
There is a lot of it, on purpose. Approachability is not only about a friendlier button in the UI. It is also about helping you understand what that button does, and when to use it. Good documentation is product work, even when it does not get its own screenshot.
There is an AI angle here too, and it belongs in the right place: this is for people first. But many of you already use AI to help build automations, and clearer, well-described building blocks give those tools much better material to work with. Their suggestions can become more consistent, because there is less Home Assistant-specific guesswork to invent. It will not happen overnight, since most models are trained on older examples and may keep suggesting the old patterns for a while. The better the documentation, the faster both people and machines pick up the new way.
Haven’t tried building automations this way yet? Open the automation editor and start with what you want to happen. We think you’ll like where it begins. 😎
Activity, the feature many of you still know as the logbook, has always been there to answer a simple question: what happened, and when? The way it answered, though, was a flat list of full sentences. “Living room lamp turned on.” “Auto lights was triggered by motion.” Every row was a complete sentence, the device name was repeated on every line, and it used its own wording (“turned on”, “changed to”) that didn’t quite match how states are written everywhere else in Home Assistant. Reading back a busy day meant reading every single line.
This release rebuilds it from the ground up into a timeline.
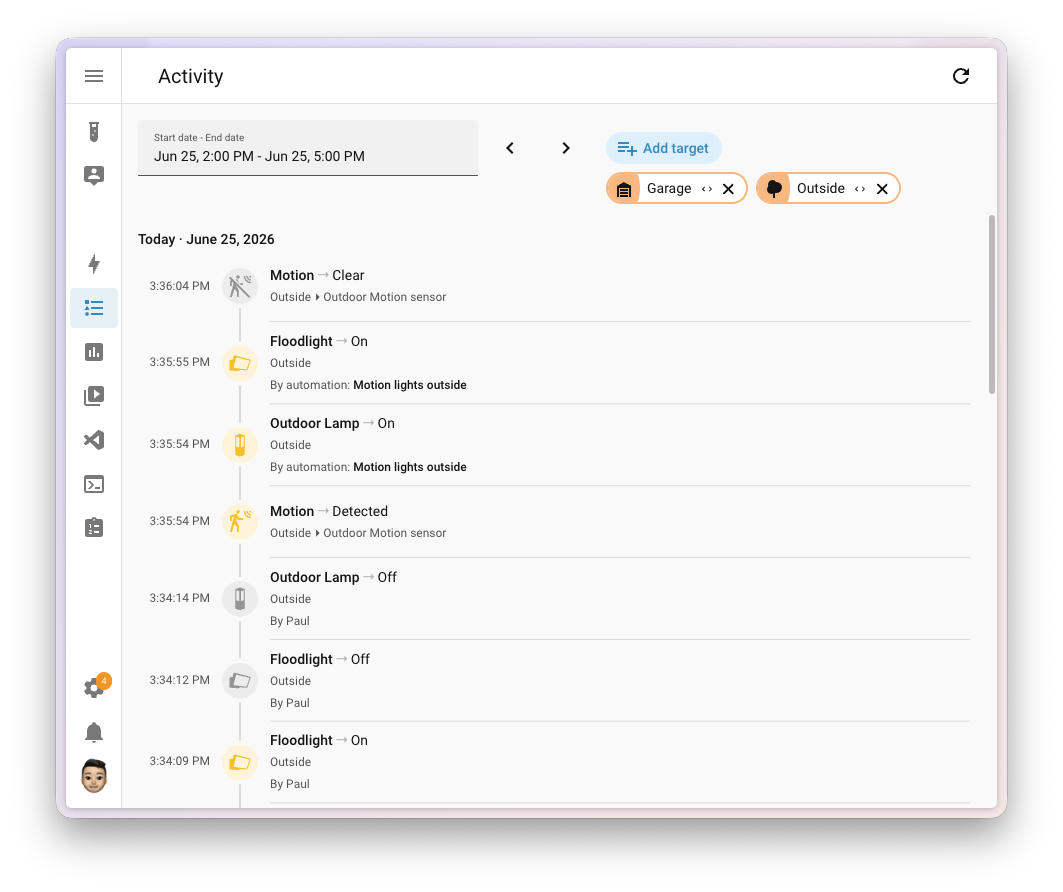
Each entry now sits on a vertical rail: the time on the left, a colored dot with the entityAn entity represents a sensor, actor, or function in Home Assistant. Entities are used to monitor physical properties or to control other entities. An entity is usually part of a device or a service. [Learn more]’s icon, and the text beside it. You read it top to bottom, like a feed. Entries are grouped by day, with Today, Yesterday, and dated headers, so you never lose track of where you are in time. The dot takes on the state color too, so an on and an off are easy to tell apart at a glance, without reading a word.
It also shows only the context you actually need. The timeline trims the name down to where you’re looking: on an entity page you just see the value, on a device page the device name is dropped, and on an area page the area is left out. No more reading the same device name on every row.
A few more touches make it feel right at home:
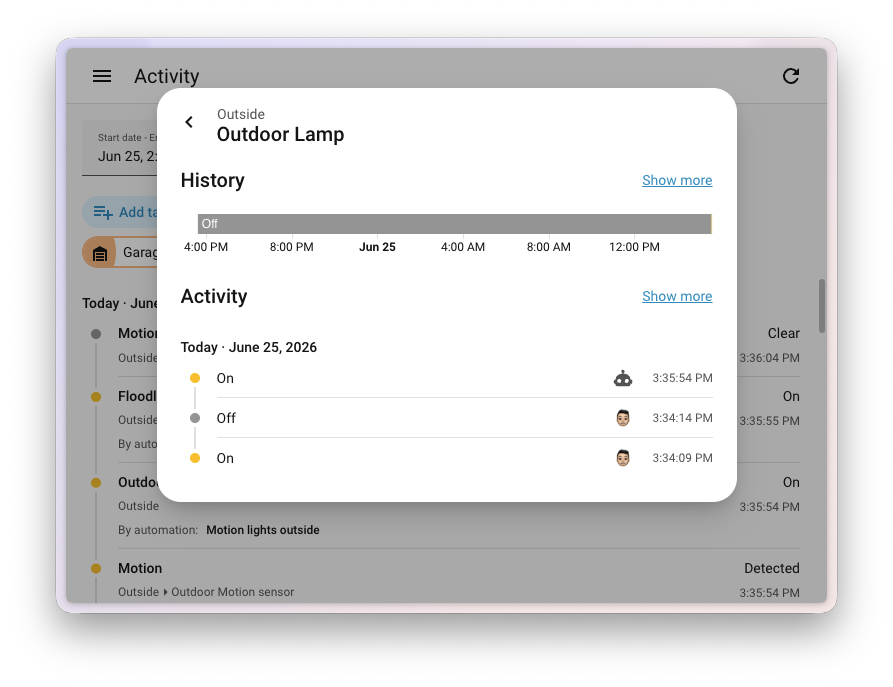
The same component powers all of this, so the timeline stays consistent whether it’s filling the full Activity page on a wide screen or tucked into a card on your phone. Wide screens get the full timeline with the time column and icons; narrow screens and cards get a compact version with the cause icon and the time trailing the entry.
We’ve all been there. You open Settings > Updates after being away for a bit, and there it is: a wall of pending updates. A new Home Assistant release, a handful of apps, that one integration, and seven ESPHome devices that all decided to ship new firmware in the same week. Keeping up used to mean working down that list one entry at a time, selecting, waiting, selecting the next, and repeating until your finger got tired.
Not anymore. This release reorganizes the updates page around how you actually think about your system, and adds a single button that does the heavy lifting: Update all.
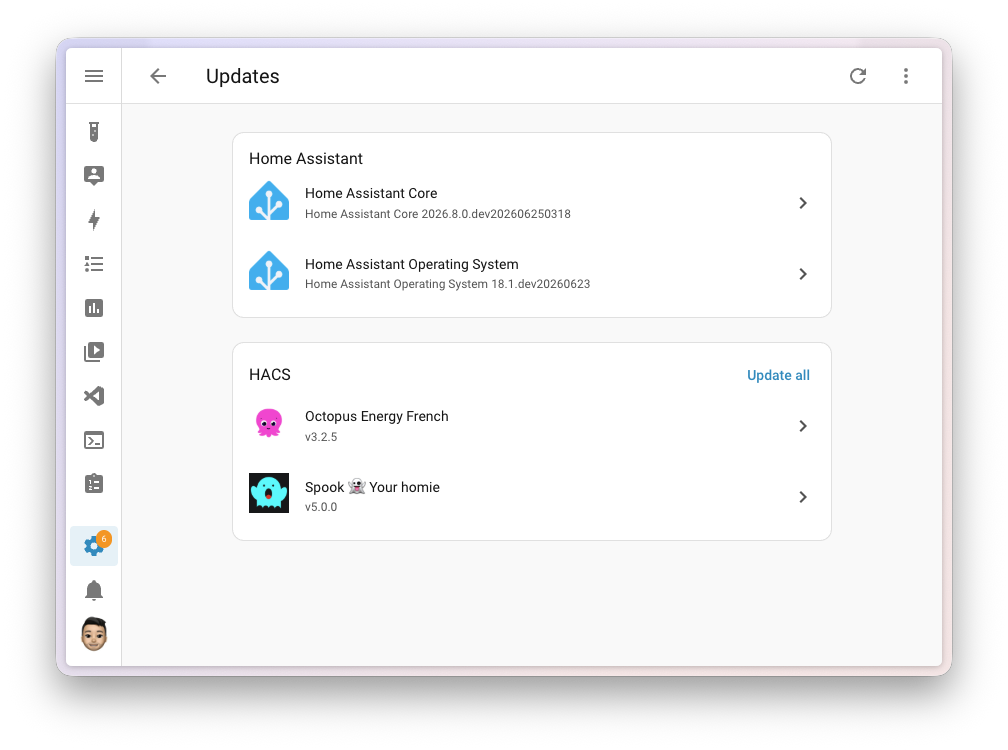
Instead of one long, flat list, your pending updates are now grouped into clear cards, each covering a part of your setup:
Select Update all on any card, and Home Assistant takes it from there, updating everything in that group in one go. No ticking boxes, no confirmation dialog to step through, just done.
It’s a small change to a page you only visit now and then, but it turns a recurring chore into a couple of taps.
Thanks to our community for keeping pace with the new integrationsIntegrations connect and integrate Home Assistant with your devices, services, and more. [Learn more] and improvements to existing ones! You’re all awesome 🥰
We welcome the following new integrations in this release:
Aqvify, added by @astrandb, launching at 🏆 platinum quality
Monitor your Aqvify water well and tank sensors in Home Assistant. The integration connects through Aqvify’s public cloud API and exposes sensors for your well water level, so you can keep an eye on your supply and build automations around it.
Chef iQ, added by @Invader444
Read the temperatures from your Chef iQ wireless cooking probes directly over Bluetooth. No cloud account, base station, or hub is needed: the probe broadcasts its readings and Home Assistant listens passively.
Dropbox, added by @bdr99
Store your Home Assistant backups straight to your Dropbox account. Setup runs through the Home Assistant Cloud Account Linking service, so you do not need a Home Assistant Cloud subscription or your own application credentials to get started. Once connected, Dropbox shows up as a backup location alongside the rest.
Edifier Infrared, added by @abmantis
Control your Edifier speaker with any infrared transmitter you already have set up in Home Assistant. Built on the Infrared entity platform, so you can pair it with an ESPHome device with an IR LED, or any other supported IR emitter. Communication is one-way, so the integration uses assumed states.
energieleser, added by @AjinkyaGokhale
Bring real-time energy readings into Home Assistant from energieleser devices, such as stromleser, gasleser, wasserleser, and wärmeleser. The integration reads consumption data over a local HTTP API, so all communication stays on your network.
Envertech EVT800, added by @daniel-bergmann-00
Monitor your Envertech EVT800 solar microinverter in Home Assistant. The integration receives data locally over your network, exposing energy and power readings you can track on dashboards and use in automations.
Greencell, added by @BrzezowskiGC
Connect your Greencell EV charging devices to Home Assistant over MQTT. It monitors charger status and electrical measurements like voltage, current, and power, and exposes real-time telemetry and charging-session data for dashboards and automations.
Helty Flow, added by @ebaschiera
Control your Helty Flow decentralized heat-recovery ventilation units with the smart Wi-Fi interface. The integration talks to each unit directly on your local network, so it keeps working without an internet connection.
KlikAanKlikUit, added by @Phunkafizer
Control self-learning KlikAanKlikUit 433.92 MHz RF devices from Home Assistant. Because the integration sends commands over RF without a feedback channel, it uses assumed states.
MELCloud Home, added by @erwindouna
Bring your Mitsubishi Electric air conditioning and heat pump products into Home Assistant through MELCloud Home, Mitsubishi Electric’s cloud service. Monitor and control your devices alongside the rest of your home automations.
This release also has new virtual integrations. Virtual integrations are stubs that are handled by other (existing) integrations to help with findability. These ones are new:
It is not just new integrationsIntegrations connect and integrate Home Assistant with your devices, services, and more. [Learn more] that have been added; existing ones keep getting better too. Here are some of the noteworthy improvements this release:
get_alerts action to fetch active weather alerts on demand. Thanks, @gwww!One thing we are incredibly proud of in Home Assistant is our integration quality scale. This scale helps us and our contributors to ensure integrations are of high quality, maintainable, and provide the best possible user experience.
This release, we celebrate several integrationsIntegrations connect and integrate Home Assistant with your devices, services, and more. [Learn more] that have improved their quality scale:
1 integration reached platinum 🏆
2 integrations reached gold 🥇
3 integrations reached silver 🥈
1 integration reached bronze 🥉
This is a huge achievement for these integrations and their maintainers. The effort and dedication required to reach these quality levels is significant, as it involves extensive testing, documentation, error handling, and often complete rewrites of parts of the integration.
A big thank you to all the contributors involved! 👏
While most integrationsIntegrations connect and integrate Home Assistant with your devices, services, and more. [Learn more] can be set up directly from the Home Assistant user interface, some were only available using YAML configuration. We keep moving more integrations to the UI, making them more accessible for everyone to set up and use.
The following integrations are now available via the Home Assistant UI:
Time for a little cleaning, and no, we did not wait for spring. The following integrationsIntegrations connect and integrate Home Assistant with your devices, services, and more. [Learn more] are no longer available as of this release. Most had been broken for a while, leaning on libraries or services that went unmaintained or offline years ago:
bluepy library, which Home Assistant dropped back in 2022.7, and which has been unmaintained since 2018.bluepy library that Home Assistant dropped in 2022.7.There are many more improvements in this release; here are some of the other noteworthy changes:
Some entitiesAn entity represents a sensor, actor, or function in Home Assistant. Entities are used to monitor physical properties or to control other entities. An entity is usually part of a device or a service. [Learn more] tell time. A sensor with the next sunrise, the timestamp of your last backup, a countdown to the next calendar event. How that moment should be shown is a matter of taste: sometimes you want the exact date and time, and sometimes a friendly “in 3 hours” or “2 days ago” is far more useful at a glance.
Until now, picking how a timestamp was displayed meant editing YAML. This release brings that choice into the UI. When you add a timestamp entity to a tile card, the entities card, or as an entity badge, a Time format option shows up in the editor, so you can choose how the time is presented, including a new short or long style for the relative format.
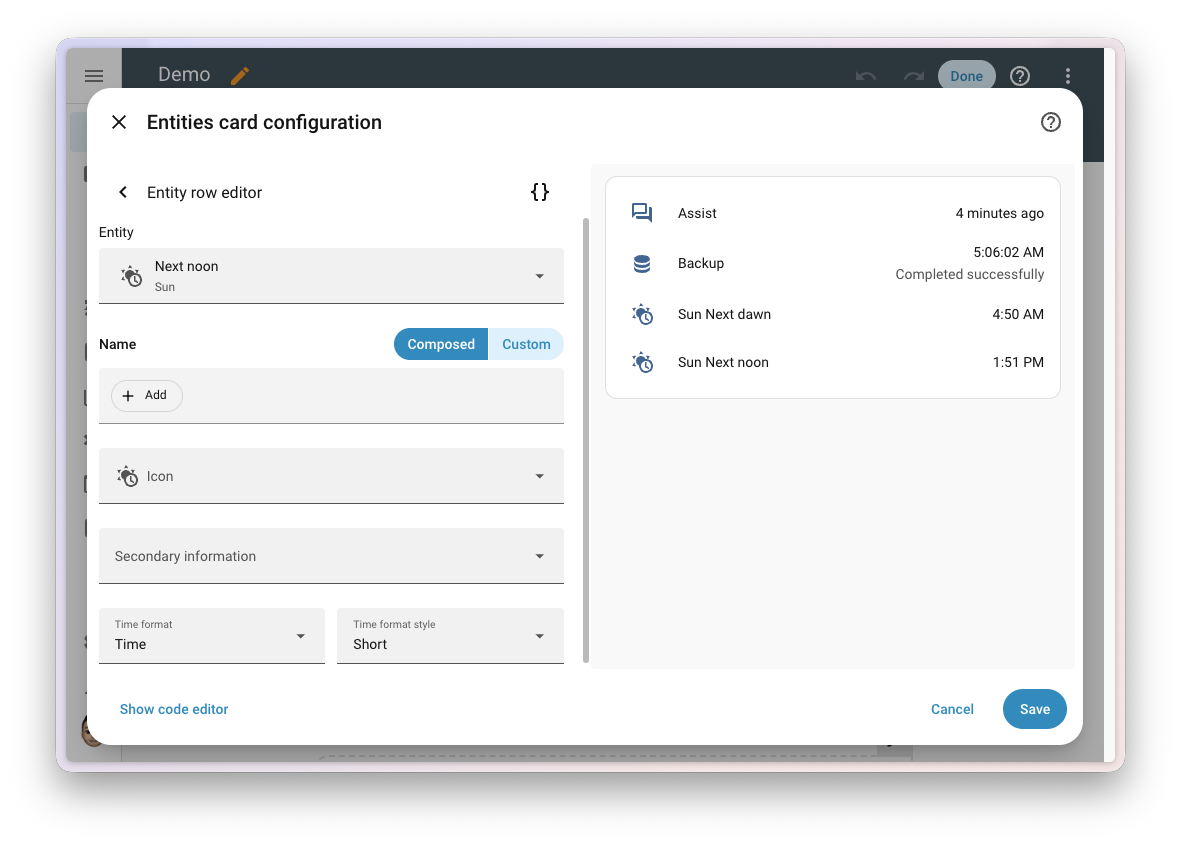
Thanks, @karwosts!
Earlier this year, Home Assistant gained dedicated entity platforms for infrared and radio frequency devices, the building blocks behind integrations that reach your gear through an IR blaster or a 433 MHz transmitter. This release gives them a proper home.
Two new panels show up in the Settings menu, one for infrared and one for radio frequency. Each lists the proxies and transmitters you’ve set up, so you can see your IR blasters and RF bridges at a glance and jump straight to the one you’re looking for, instead of hunting for them among everything else. The panels only appear when you actually have such devices, so they stay out of the way if you don’t.
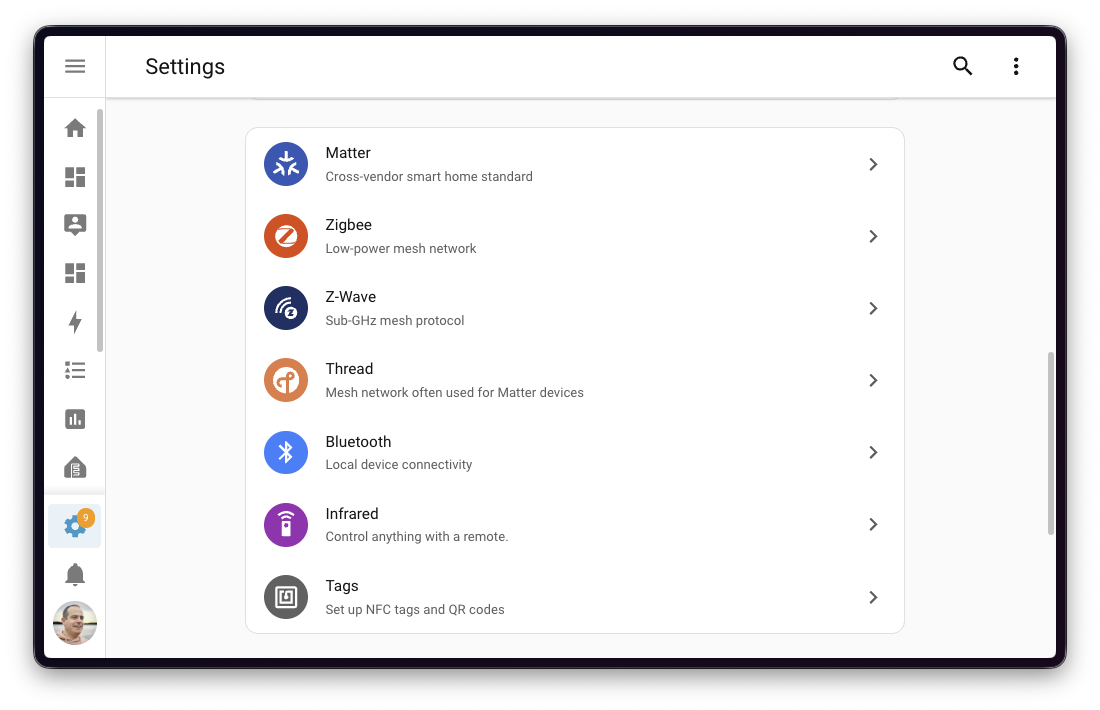
Thanks, @balloob!
Managing a Zigbee device through ZHA used to mean squinting at a cramped dialog. The clusters, bindings, signature, and neighbors tools were all there, but crammed into a small popup that left little room to breathe.
This release moves all of that onto a dedicated, full-page device view. The same tools are now laid out across tabbed navigation, with a device summary card up top, and the loading, empty, and error states have been cleaned up throughout. It’s the same powerful Zigbee management, just far easier to work with.
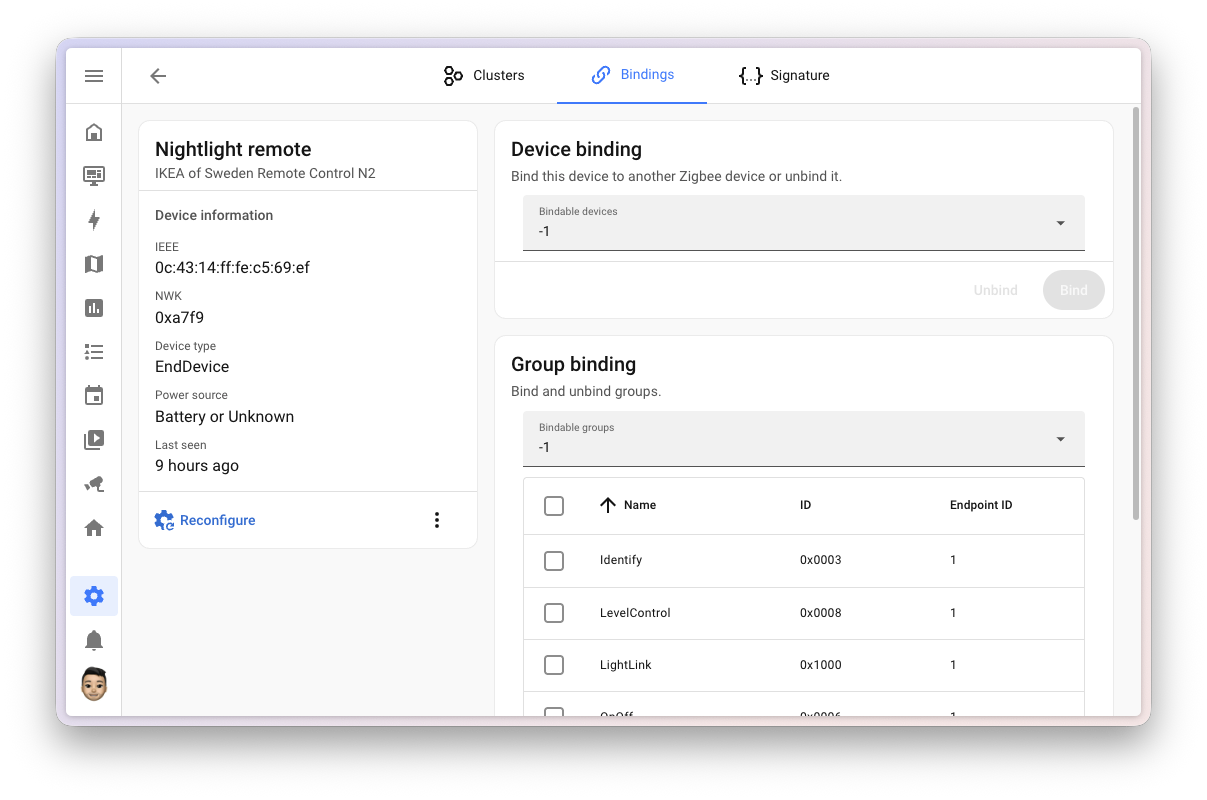
Thanks, @jpbede!
Running Home Assistant Operating System on a Raspberry Pi? You are in good company: per our public, opt-in analytics, the Raspberry Pi platform currently powers about a third of all installations. As of this release, there is an “update entity”An update entity is an entity that indicates if an update is available for a device or service. [Learn more] for the Pi’s bootloader firmware, also often referred to as the EEPROM update. You can keep it current right from Settings > Updates, the same place you handle every other update.
This is more than a nice-to-have. Especially on the Raspberry Pi 5 and Compute Module 5, the firmware contains bug fixes, compatibility improvements for NVMe drives, thermal improvements, and much more. Until now, updating that firmware was cumbersome: you had to flash another SD card with a special image, or connect a keyboard and a display and run the rpi-eeprom-update command by hand. Now it takes a single step.
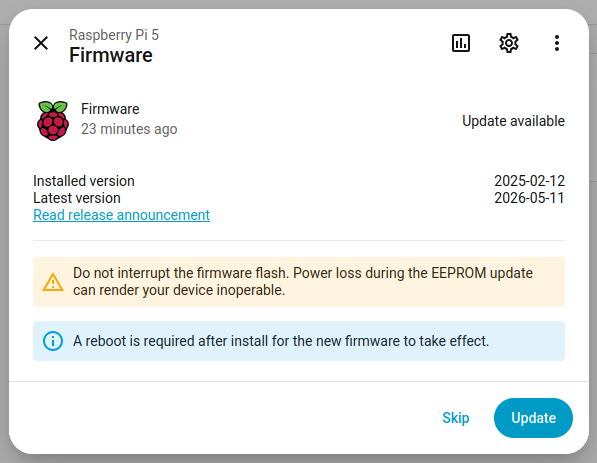
A few things to keep in mind:
Thanks, @sairon!
We will also release patch releases for Home Assistant 2026.7 in July. These patch releases only contain bug fixes. Our goal is to release a patch release once a week, aiming for Friday.
in_zones attributes (@kbuck1 - #172602)To headers in SMTP integration (@tr4nt0r - #175803)Apologies for shipping off schedule. This patch release should have shipped last Friday, but we weren’t able due to technical difficulties.
Home Assistant has a great community of users who are all more than willing to help each other out. So, join us!
Our very active Discord chat server is an excellent place to be, and don’t forget to join our amazing forums.
Found a bug or issue? Please report it in our issue tracker to get it fixed! Or check our help page for guidance on more places you can go.
Are you more into email? Sign up for the Open Home Foundation Newsletter to get the latest news about features, things happening in our community, and other projects that support the Open Home straight into your inbox.
We do our best to avoid making changes to existing functionality that might unexpectedly impact your Home Assistant installation. Unfortunately, sometimes it is inevitable.
We always make sure to document these changes to make the transition as easy as possible for you. This release has the following backward-incompatible changes:
Several entity triggers and conditions, part of the new purpose-specific triggers and conditions, have been renamed so their keys are consistent across all domains. The old keys no longer work.
The following triggers changed:
battery.low is now battery.became_lowbattery.not_low is now battery.no_longer_lowlawn_mower.docked is now lawn_mower.returned_to_dockschedule.turned_off is now schedule.block_endedschedule.turned_on is now schedule.block_startedtimer.time_remaining is now timer.remaining_time_reachedupdate.update_became_available is now update.became_availablevacuum.docked is now vacuum.returned_to_dockThe following conditions changed:
climate.target_humidity is now climate.is_target_humidityclimate.target_temperature is now climate.is_target_temperatureIf an automation or script uses one of these, it will stop working until updated. To fix it, open the affected automation or script, re-select the trigger or condition (it now appears under its new name), and save. If you edit in YAML, replace the old key with the new one from the list above.
The BSB-LAN integration has reduced its support for the older version 1 JSON API. If your BSB-LAN device runs very old firmware that only speaks the version 1 API, update it to firmware that supports the version 2 API to keep everything working.
A repair notification will let you know if your device is affected.
The battery_level attribute has been removed from iCloud device tracker entities. Use the dedicated battery sensor in your automations and scripts instead.
Person entities no longer report the latitude and longitude of the home zone when their location comes from a presence scanner associated with the home zone.
If you have automations or scripts that check the coordinates of a person, adjust them. To check whether a person is in a specific zone, use the new in_zones state attribute instead.
The Rabbit Air fan preset mode values changed from title case to lowercase to match Home Assistant’s state convention: Auto is now auto, Manual is now manual, and Pollen is now pollen. The user-facing labels stay the same through translations.
Update any automations, scripts, templates, or action calls that reference the old title-case preset values.
Reolink Duo PoE and Duo WiFi dual-lens cameras now expose a sub-device per lens. The camera and motion/AI sensor entities that previously had a “lens 0” or “lens 1” suffix in their name are moved to the new lens sub-devices and lose that suffix. Entity IDs and custom names stay the same, so most automations keep working.
If you target these entities through the camera device, update them to use the new lens sub-devices.
The battery_level attribute has been removed from StarLine device tracker entities. Use the dedicated battery sensor in your automations and scripts instead.
The route device tracker (device_tracker.<vehicle>_route) no longer reports the active route’s destination name as its state. Its state is now derived from your zones like a normal device tracker (home, not_home, or a zone name), based on the route’s coordinates.
The destination name is still available through the new destination sensor (sensor.<vehicle>_destination), which is disabled by default. Enable it from the entity settings if you have automations that relied on the destination name, and update any automations that matched the old route tracker state.
The route device tracker no longer reports the active route’s destination as its state or through a location_name attribute. Its state is now derived purely from the route’s coordinates (zone-aware, like home or not_home).
If you relied on the destination name, enable the new Destination sensor (sensor.*_destination), which is disabled by default and reports the destination name as Tesla provides it.
The battery_level attribute has been removed from Tractive device tracker entities. Use the dedicated battery sensor in your automations and scripts instead.
The legacy requires_api_password field has been removed from the Home Assistant zeroconf/mDNS discovery announcement (_home-assistant._tcp). It had been hardcoded to true since the http.api_password authentication mechanism was removed in Home Assistant 2024.7, so it no longer carried any meaning. The official companion apps already ignore it.
Third-party discovery clients that still read this field need to tolerate its absence.
(@agners - #173090) (Zeroconf documentation) (API documentation)
The state (person count) and persons attribute of zone entities are now calculated from the in_zones attribute of person entities. As a result, a person can now be counted in more than one zone at the same time. For example, a person who is home with in_zones: ["home", "near_home"] now counts toward both zone.home and zone.near_home, where previously they only counted toward zone.home.
In addition, the state of position-aware device trackers is now the smallest zone the device is in, instead of the zone whose center it is closest to.
Automations, scripts, or templates that depend on zone person counts or on device tracker zone states may need to be adjusted.
This release requires an updated Z-Wave JS server. You need zwave-js-server 3.9.0 or newer (schema 49):
If you are a custom integration developer and want to learn about changes and new features available for your integration: Be sure to follow our developer blog. The following changes are the most notable for this release:
home_assistant_start flag of async_initialize_triggersOf course, there is a lot more in this release. You can find a list of all changes made here: Full changelog for Home Assistant Core 2026.7.
Hi,
The OpenWrt community is proud to announce the fifth service release of the OpenWrt 25.12 stable series.
Download firmware images using the OpenWrt Firmware Selector:
Download firmware images directly from our download servers:
Only the main changes are listed below. See the full changelog for details.
This release fixes several remotely triggerable vulnerabilities in core network services that are enabled by default. Updating is strongly recommended.
/etc/shadow). GHSA-jw5r-xhf5-2xcqtailscale.do_login. GHSA-xwc5-mx58-rh35/bin/sh via file.exec, allowing delegated users to run commands as root. GHSA-vj96-f37g-37f6file.exec permission. GHSA-vx64-mmp7-h36chandle_send_a() allowed a pre-auth denial of service. GHSA-9558-77jp-g3fwBeyond the issues listed above, this release fixes a number of further security problems for which no CVE number or dedicated advisory was assigned. We strongly recommend upgrading to the latest OpenWrt release and installing all available package updates.
New devices supported in 25.12.5:
New image variants for already supported devices:
Device fixes:
AG71XX_LEGACY as a module, fixing AR8216/AR8236/AR8316 switch bring-up on boot on some MikroTik devices (#23739)kmod-nf-nathelper-extra was split into individual per-protocol packages, so only the needed NAT helper modules have to be installed.max-page-size to the target page size removes unnecessary padding, which can make many binaries - and thus the images - a bit smaller.Upgrading from 24.10 to 25.12 should be transparent on most devices, as most configuration data has either remained the same or will be translated correctly on first boot by the package init scripts.
For upgrades within the OpenWrt 25.12 stable series, Attended Sysupgrade is also supported, which allows preserving the installed packages.
Sysupgrade from 23.05 or earlier to 25.12 is not officially supported.
Cron log level was fixed in busybox. system.@system[0].cronloglevel should be set to 7 for normal logging. 7 is the default now. If this option is not set, the default is used and no manual action is needed. fc0c518
Bananapi BPI-R4: Interface eth1 was renamed to sfp-lan or lan4, and interface eth2 was renamed to sfp-wan to match the labels. You have to upgrade without saving the configuration. cd8dcfe
TP-Link RE355 v1, RE450 v1 and RE450 v2: The partition layout and block size changed in this release to fix configuration loss on sysupgrade. Users upgrading from OpenWrt 25.12.0 or earlier must use sysupgrade -F to force the upgrade. The image must not exceed 5.875 MB (6016 KiB).
Meraki MX60: Direct sysupgrade to 25.12.5 is not possible without manual preparation — meraki_loadaddr must be changed before upgrading, as the default value is insufficient to boot OpenWrt 25.12+. See the device wiki page for instructions.
Sitecom WLR-7100 (X7 AC1200): This device was moved from the ath79/generic target to the ath79/tiny target in OpenWrt 25.12.4. Users upgrading from 25.12.3 or earlier need to flash the new image from the ath79/tiny target (use sysupgrade -F).
eth1 to wan — check and update your network configuration after upgrading.cake_mq): throughput may be unexpectedly low on some configurations after the scheduler fixes in this release. #22344Full release notes and upgrade instructions are available at
https://openwrt.org/releases/25.12/notes-25.12.5
In particular, make sure to read the known issues before upgrading:
https://openwrt.org/releases/25.12/notes-25.12.5#known_issues
For a detailed list of all changes, refer to
https://openwrt.org/releases/25.12/changelog-25.12.5
To download the 25.12.5 images, navigate to:
https://downloads.openwrt.org/releases/25.12.5/targets/
Use OpenWrt Firmware Selector to download:
https://firmware-selector.openwrt.org?version=25.12.5
As always, a big thank you goes to all our active package maintainers, testers, documenters and supporters.
Have fun!
The OpenWrt Community
To stay informed of new OpenWrt releases and security advisories, there
are new channels available:
a low-volume mailing list for important announcements:
https://lists.openwrt.org/mailman/listinfo/openwrt-announce
a dedicated "announcements" section in the forum:
https://forum.openwrt.org/c/announcements/14
other announcement channels (such as RSS feeds) might be added in the future, they will be listed at https://openwrt.org/contact

It started as a passion project. Yet in a few years matter.js has grown beyond my wildest expectations, becoming the backbone of the open source Matter ecosystem, and powering everything from Homebridge to openHAB, and even some commercial products.
Ten months ago, I joined forces with the Open Home Foundation to work full time as Lead Developer of Matter. Shortly after, I donated matter.js to the foundation – giving it a new home where it would be safeguarded for the future. Together we announced our plans to take Matter support in Home Assistant in a completely new direction: we set out to rebuild the Open Home Foundation Matter Server – the engine that powers Matter in Home Assistant – on matter.js.
After four months of beta testing, with our community fixing bugs and contributing new features along the way, today we’re thrilled to present the newest version of Matter for Home Assistant! 🎉
The Open Home Foundation invests in important technology to make open alternatives possible, and our work is funded in part by everyone who subscribes to Home Assistant Cloud and buys official hardware from our commercial partners. The launch of a new Matter experience in Home Assistant shows what’s possible with your support. 💪
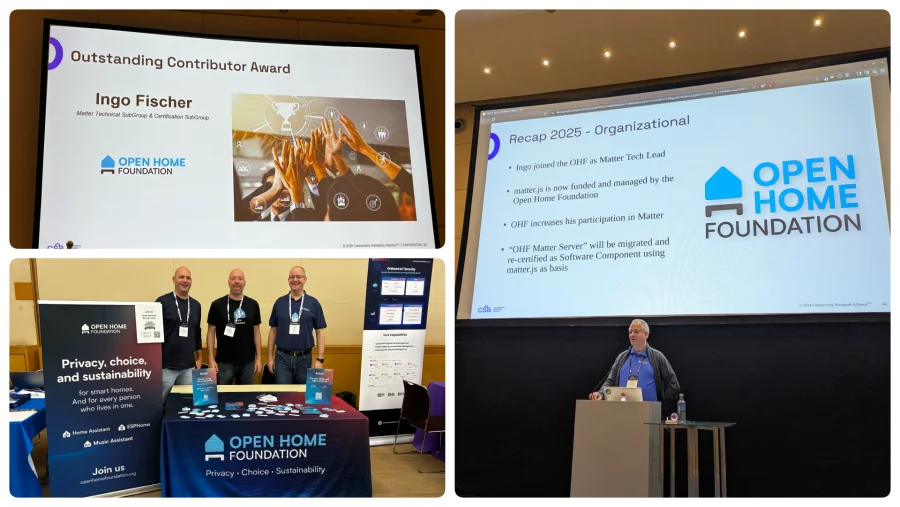 Presenting the matter.js plans at the Connectivity Standards Alliance (CSA) Member Meeting in November 2025 (right), and returning in March 2026 as an Outstanding Contributor Award recipient (left).
For those new to matter.js, it’s an open source TypeScript implementation of the Matter standard. I built it to give developers and power users more speed and flexibility, and to make Matter better suited for open source development across the millions of homes that use Home Assistant. By running Matter in Home Assistant on matter.js, all of those benefits now flow directly into the platform.
This major update brings greater stability for Matter in Home Assistant, fewer bugs, and faster start-up and recovery. It also comes with a brand new visualization feature to help you understand your network (more on that below 👀). And by upgrading to the Matter 1.5.1 specification (1.6 coming soon!), we’re better equipped to improve support for all new Matter device types, such as cameras, doorbells, and closures.
Coupled with an updated OpenThread Border Router (OTBR) app to support Thread 1.4 in Home Assistant, these changes mark important steps in making Matter work more reliably within your setup, now and into the future. But don’t just take our word for it – here’s what our beta testers are saying:
"The new Matter Server has evolved into the ultimate Matter controller and troubleshooting tool for power users, backed by an incredible open community that continues to push the standard forward."
- Ward Zhou, Smart Home Journalist"The new matter.js server is fantastic. I love all the new possibilities it offers. In particular, the new Thread mesh view is unique and helps keep the Thread network under control at all times. The icing on the cake is that Home Assistant now supports Matter 1.5.1. This means Home Assistant's Matter implementation is once again at the forefront of the industry."
- hoppel118, Home Assistant Discord Member"Joining the beta program was born as a last resort to get my Matter/Thread network going. But it was a great experience! While I'm not at all a power user nor programmer, I could contribute at some degree. The very short feedback loop and close involvement of the developer made this a nice (and easy!) way to contribute to the development of the Open Home."
- Haapster, Home Assistant Discord MemberWhen Matter emerged a few years ago, we immediately saw its potential to shape the industry for the better. As an open standard that lets smart devices from different brands speak the same language, it represents the kind of interoperable tech the Open Home Foundation exists to champion. So we set out to build on it.
Just weeks after Matter’s official launch in 2022, we added the Matter integration to Home Assistant, and in 2025 both Home Assistant and the Open Home Foundation Matter Server were officially certified by the Connectivity Standards Alliance. That server was built with Python and the official C++ Matter SDK – a solid starting point, but one that couldn’t keep pace with our open source ambitions.
Matter now runs in 38% of Home Assistant instances, and ranks twelfth among all integrations – a clear sign of where the smart home world is heading. We want that future to have fewer compatibility headaches, more device choice, and a smart home that just works. This update to Matter support in Home Assistant takes a huge step toward that vision.
The new Matter experience in Home Assistant is delivered through the “Matter Server app 9.0” – a fully compatible drop-in replacement for the previous Python-based server. After you’ve updated the app, it will automatically migrate your data on the first start, and work in exactly the same way that the previous server did.
The real benefits kick in with every subsequent server start and device reconnection. Thanks to a range of optimizations, devices now come back online much faster, networks are more responsive, and over-the-air updates are more reliable.
Beyond performance, the new server also tightens security. When commissioning new devices, uncertified devices with an official development/test certificate can no longer be added out of the box, ensuring no malicious devices are added to your Matter network without your knowledge. Additionally, the new server checks certificate revocation data during commissioning, adding another layer of protection.
While the Matter Server’s web UI received a range of new and improved features, the ability to visualize your Thread or Wi-Fi networks steals the show.
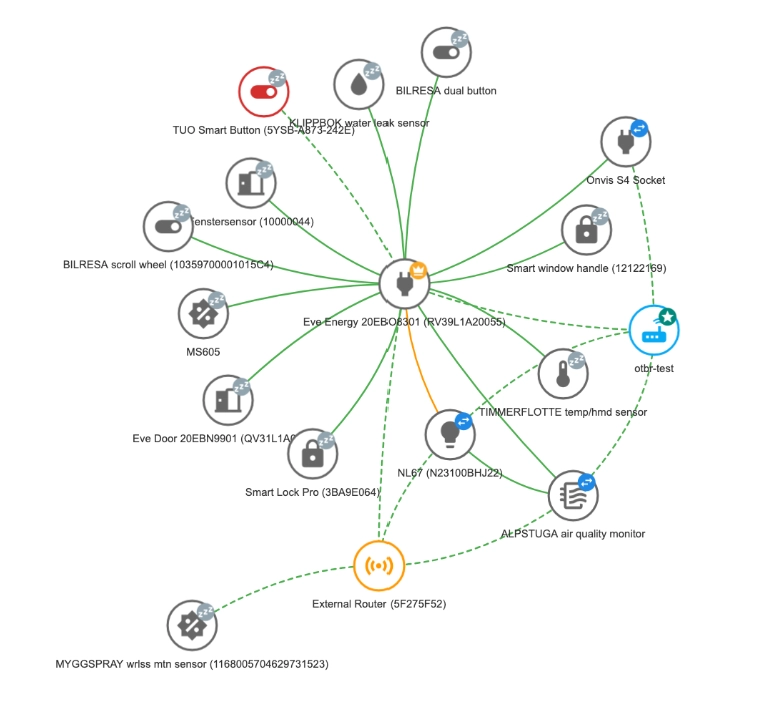 Your whole network, at a glance.
The visualization feature draws details from your commissioned Matter devices to map the network and offer insights into connection quality. Each device appears as a node, with small icons indicating its role in the network – whether it’s a leader (crown), a router (arrows), a sleepy, or another end device. The color of the connections between nodes reflects connection quality: green is strong, orange medium, red weak, and gray no signal (for those that want a deeper dive, check out our GitHub documentation).
This is especially helpful for Thread networks, where there can be multiple “hops” between a device and the border router, and the devices themselves decide how data is routed. Where possible, border routers are also discovered and displayed, giving you a fuller picture of how your network is structured. The visualization also helps with Wi-Fi devices, making it easier to see which device is connected to which access point, and at what signal quality.
Graduating Home Assistant to matter.js wouldn’t have been possible without our community, who’ve helped grow Home Assistant into one of the biggest smart home platforms in the world.
With these new changes, we’re better placed than ever to make Matter in Home Assistant more approachable for all. Head to the Open Home Foundation roadmap to add your voice to what comes next. We can’t wait to keep building together ⚒️.
Every smart home has them: the older devices that still work perfectly well but no longer fit neatly into a modern setup. Instead of letting them gather dust in a drawer, the Open Home Foundation’s projects can help you bring them back into the fold. Here’s how a little proxying can give your beloved old gear a new lease of life, and keep your smart home that bit more sustainable.